

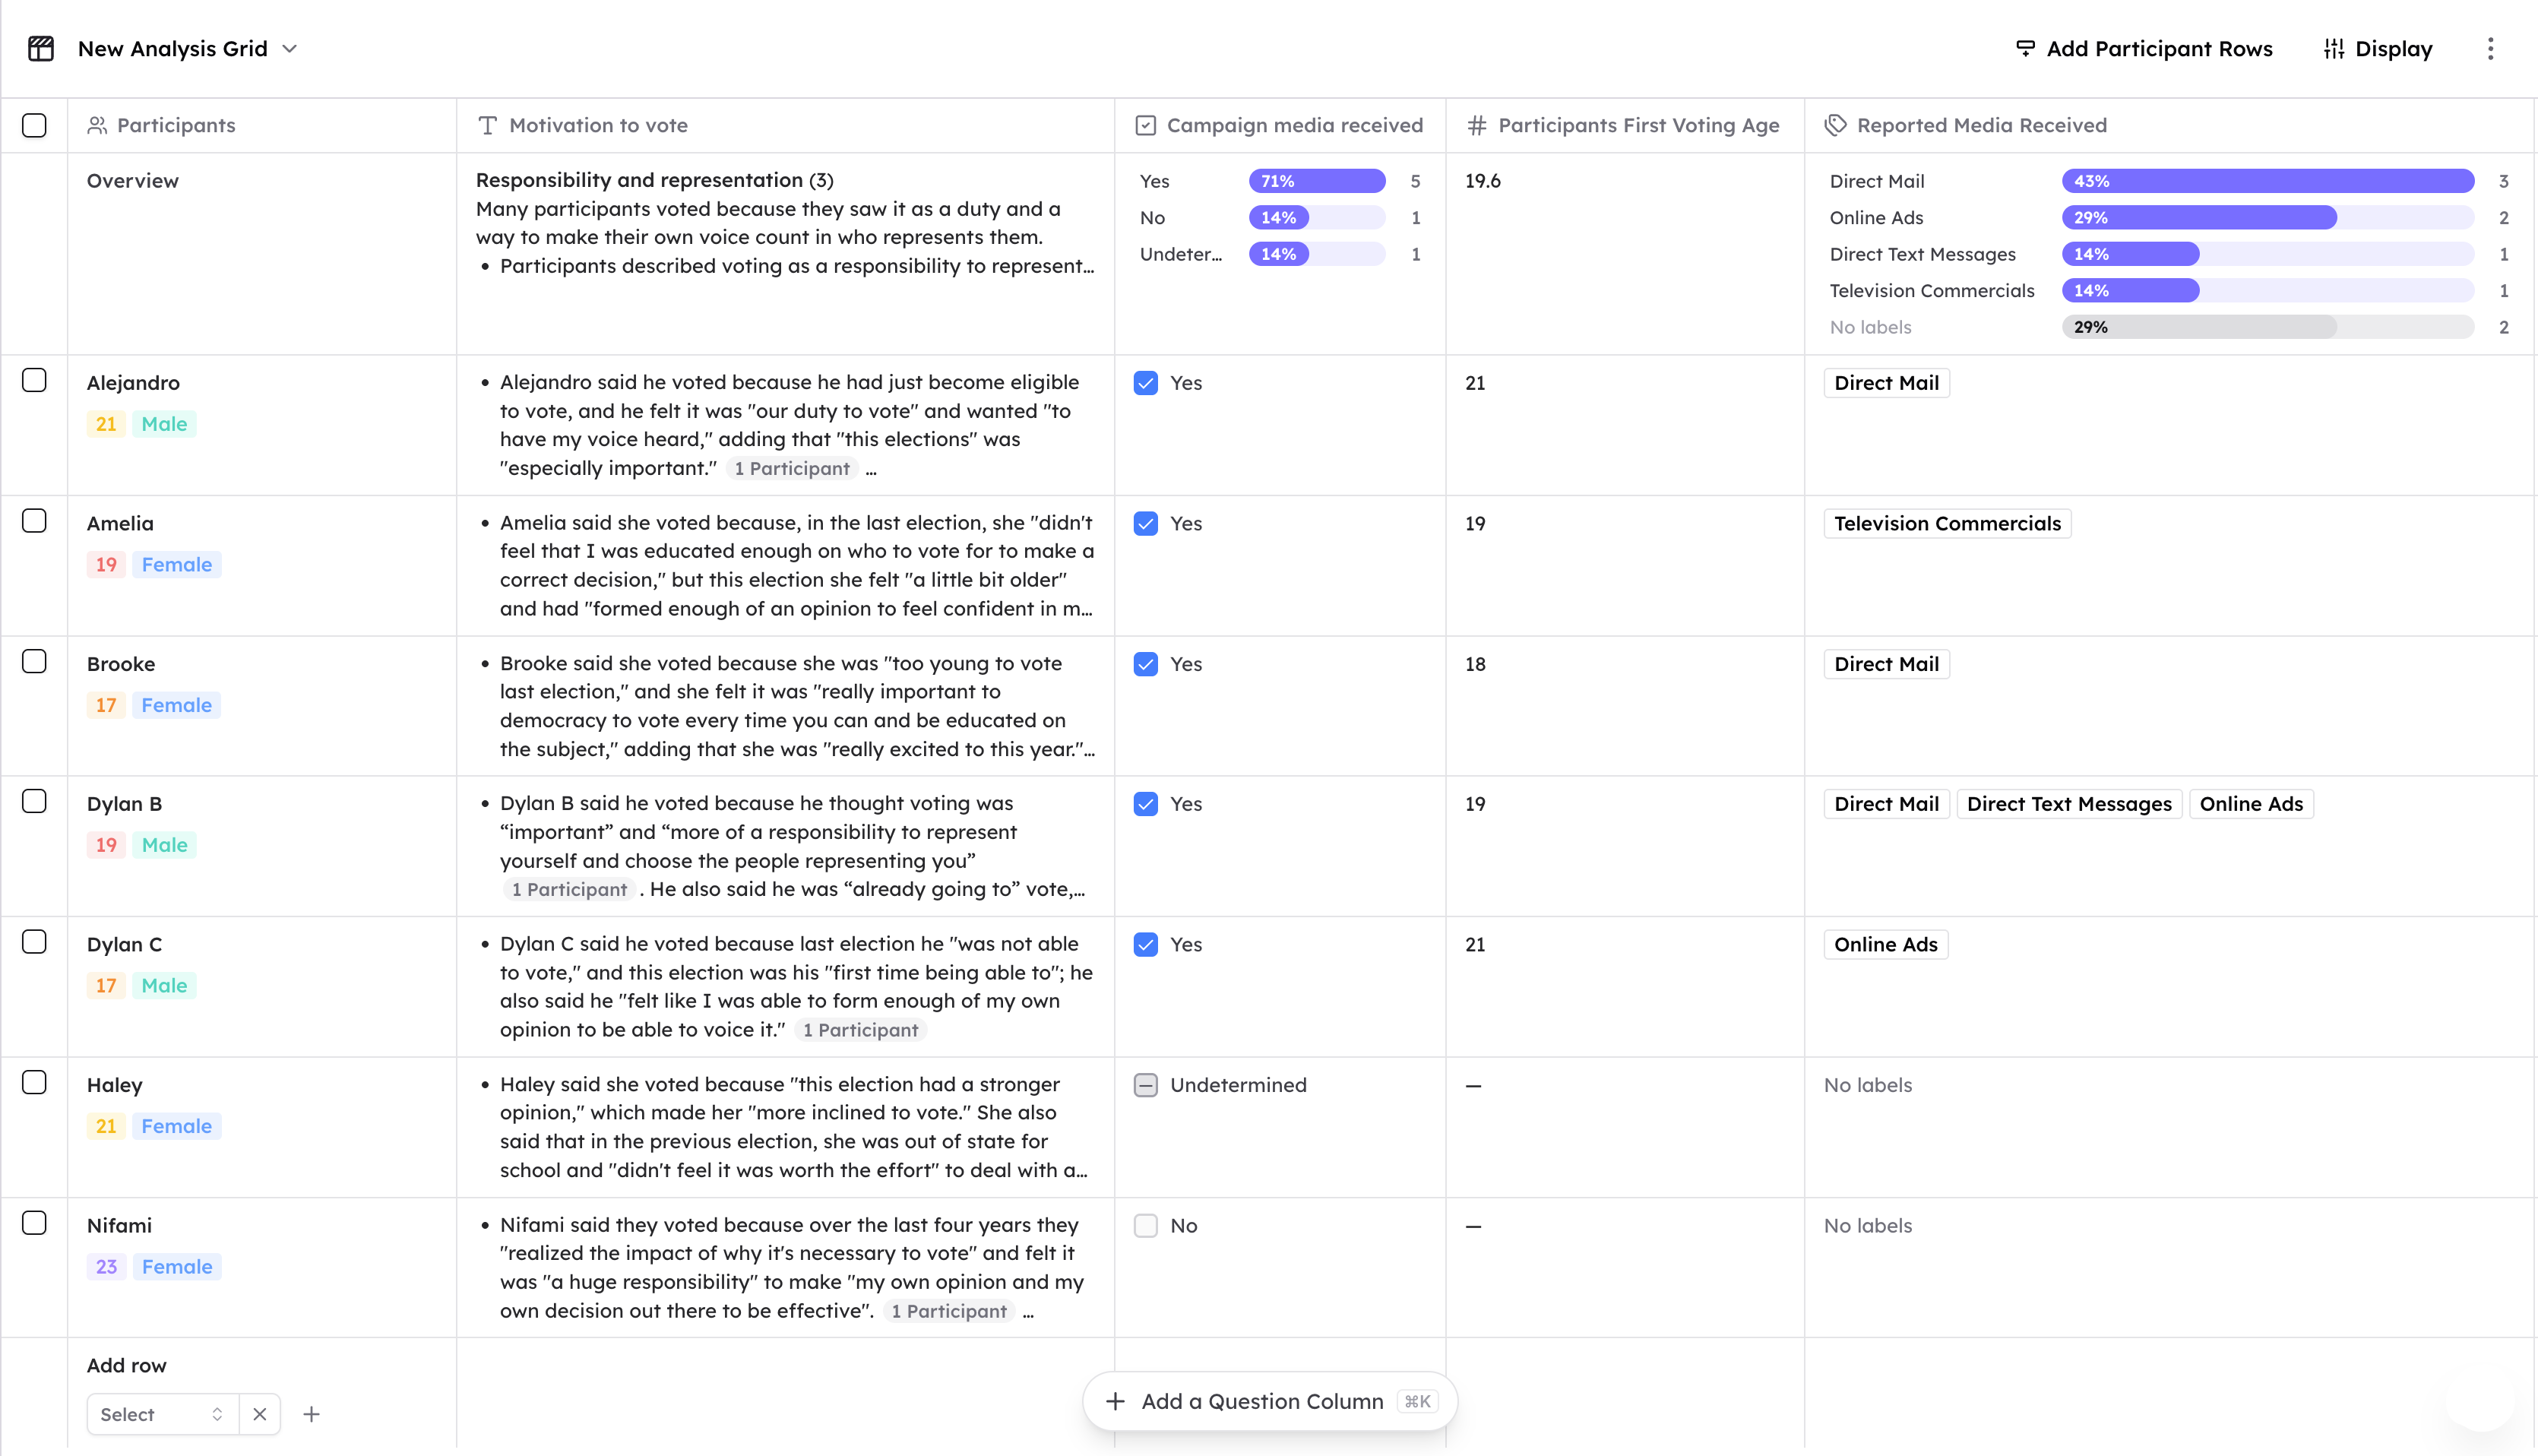
- Rows decide whose data an answer draws on — one participant, one segment, or a combination you build.
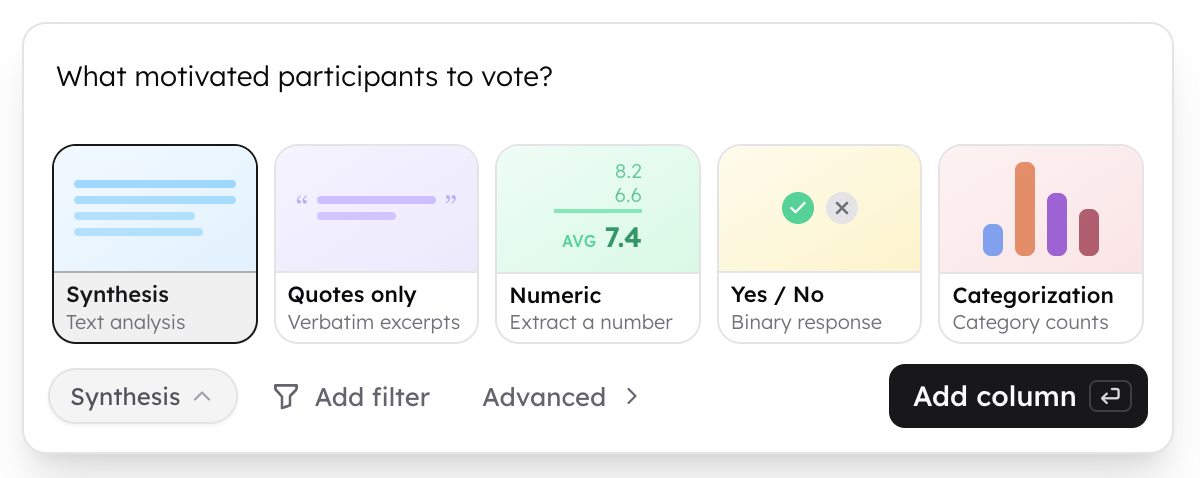
- Columns are the questions you ask. Each column has an output type, so every answer fits the question: synthesized analysis, verbatim quotes, an extracted number, a yes/no, or coded categories with counts.
- Cells hold one row’s answer to one column’s question.
- The Overview row at the top gives a summary of all rows’ responses to each question.
Create a grid
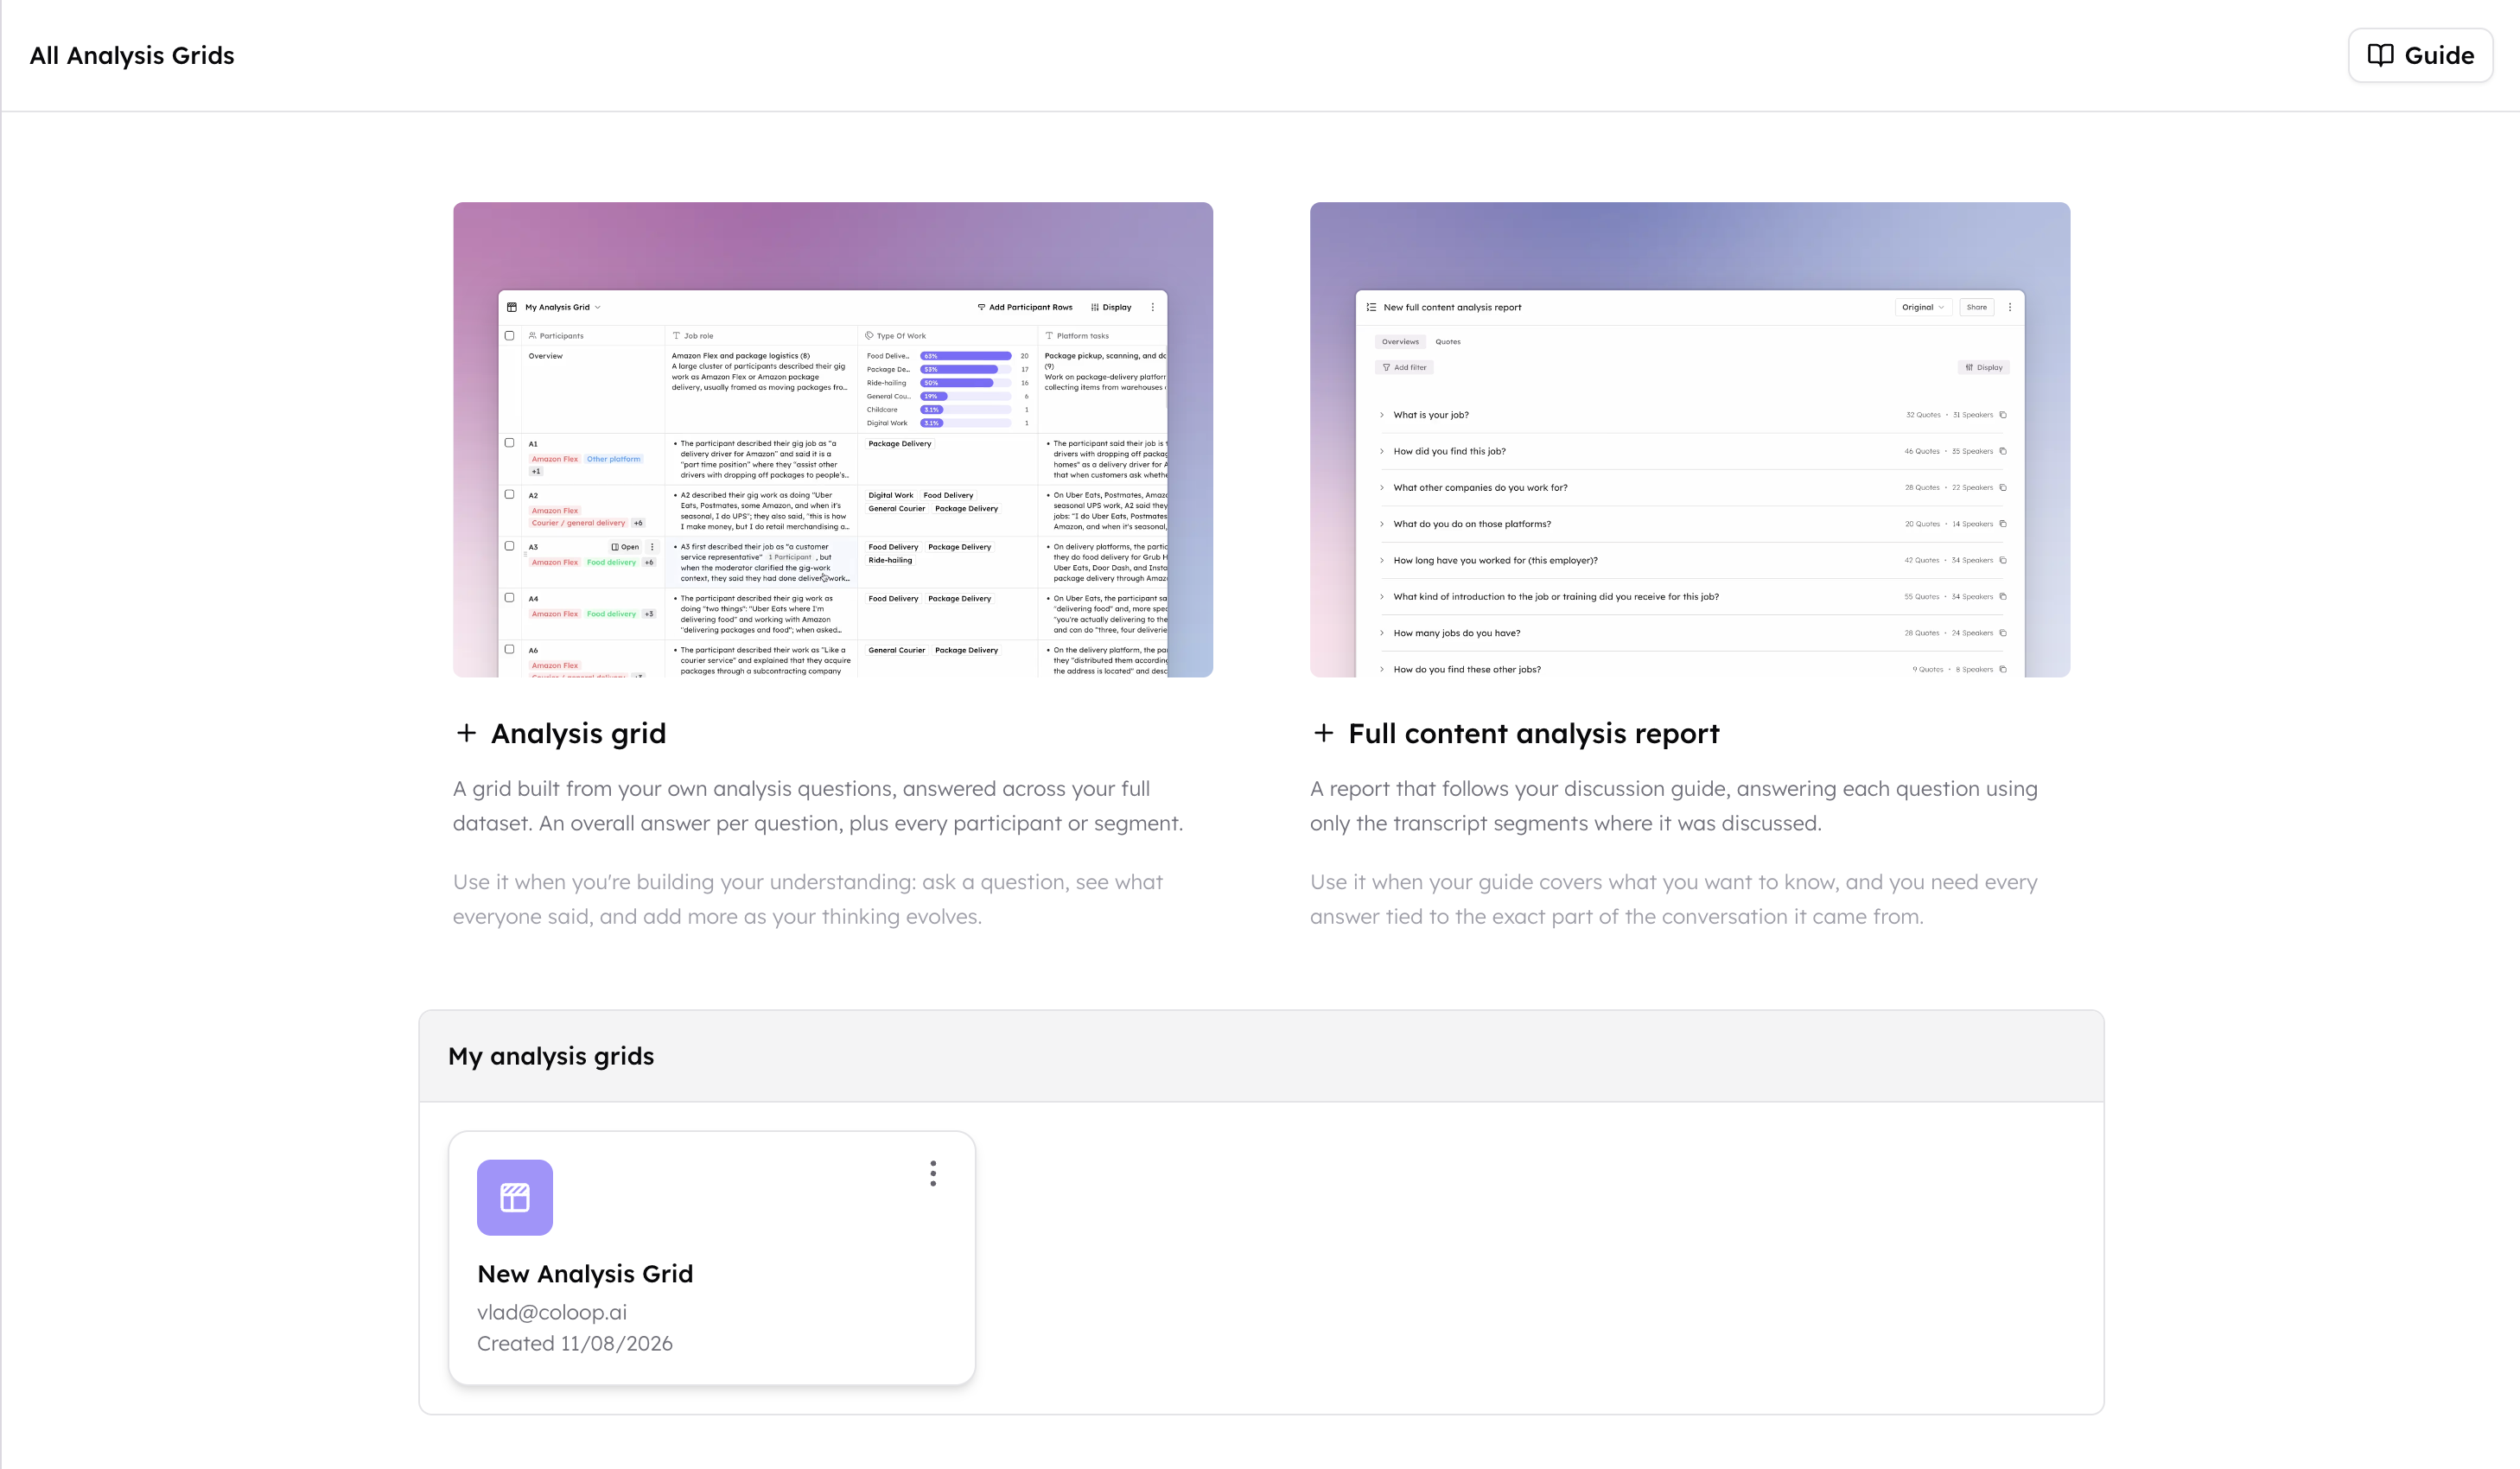
- In your project sidebar, click Analysis grid.
- Click the + Analysis grid card.
- Give the grid a name.
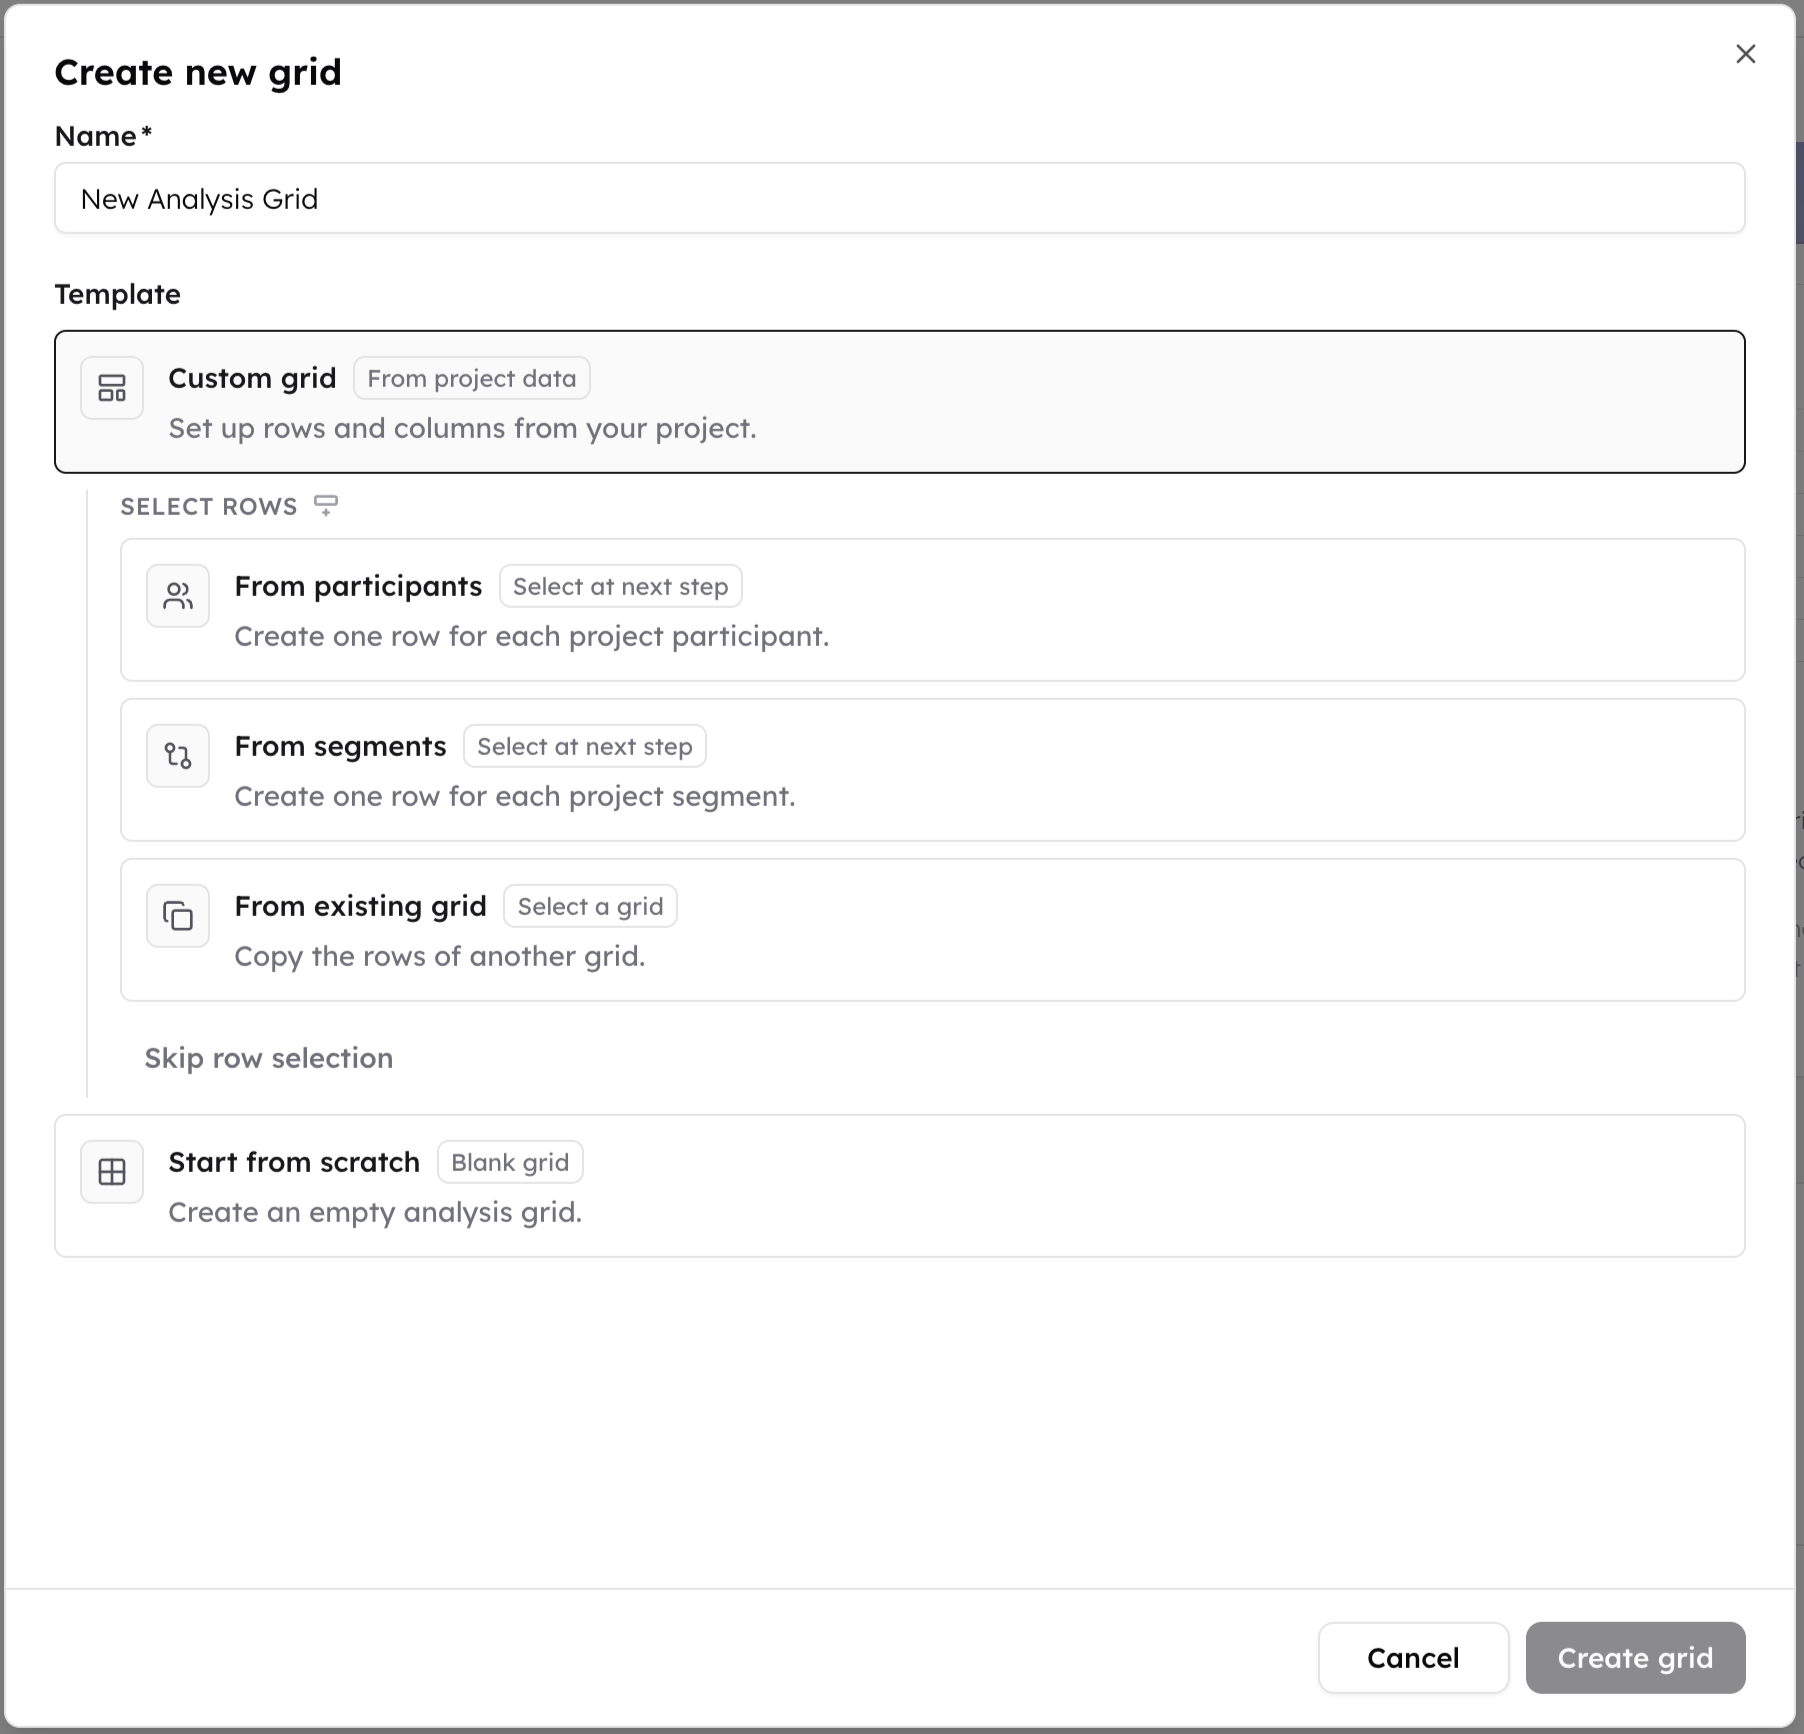
- Choose how to set it up:
- Custom grid — build the grid from your project data. Pick where the rows come from (participants, segments, or an existing grid), then where the columns come from (your discussion guide, an existing grid, or skip to add your own questions).
- Start from scratch — create an empty grid and add the rows and columns yourself.
- Click Create grid.
 With a custom grid, CoLoop creates the grid and then prompts you to select the exact participants, segments, and questions you’d like in your grid. On your very first analysis grid, the display setup comes first, and then you will be prompted to select your row and column setup once you’ve saved or skipped it.
A row or column source you can’t use yet is grayed out: From participants and From segments require participants or segments in the project, From discussion guide requires a discussion guide, and From existing grid requires another grid in the project to copy from.
With a custom grid, CoLoop creates the grid and then prompts you to select the exact participants, segments, and questions you’d like in your grid. On your very first analysis grid, the display setup comes first, and then you will be prompted to select your row and column setup once you’ve saved or skipped it.
A row or column source you can’t use yet is grayed out: From participants and From segments require participants or segments in the project, From discussion guide requires a discussion guide, and From existing grid requires another grid in the project to copy from.
Choose your rows
Each row carries a filter that decides whose data its answers come from. A row can be a single participant, a whole segment, or several of both combined.Add one row per participant or segment
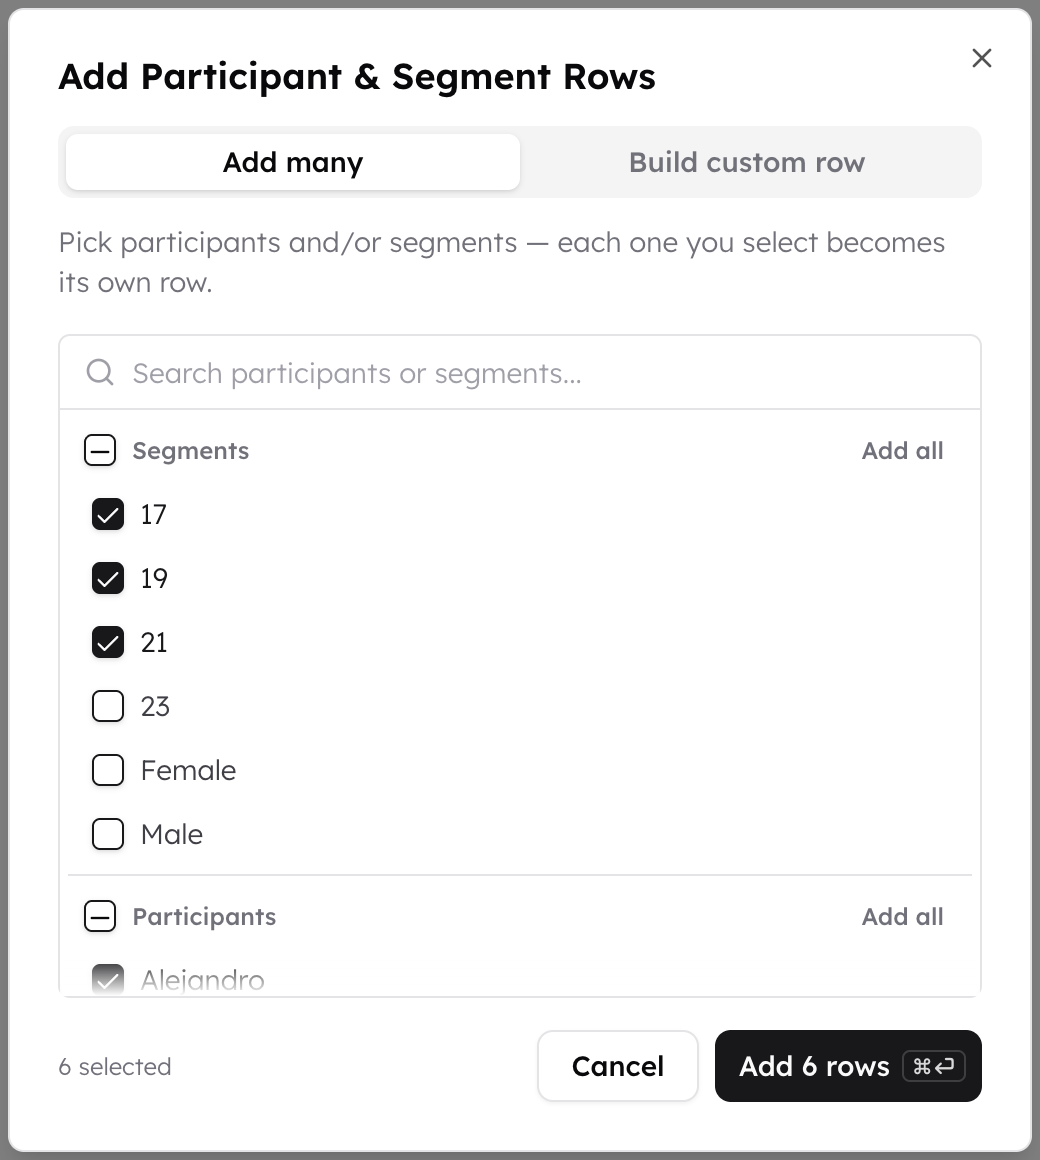
- Click Add Participant Rows in the grid header.
- Stay on the Add many tab.
- Search for participants and segments, and select the ones you want. Use Add all on a group heading to select everything in it, and Clear all to undo that.
- Click Add rows.
Combine several participants or segments into one row
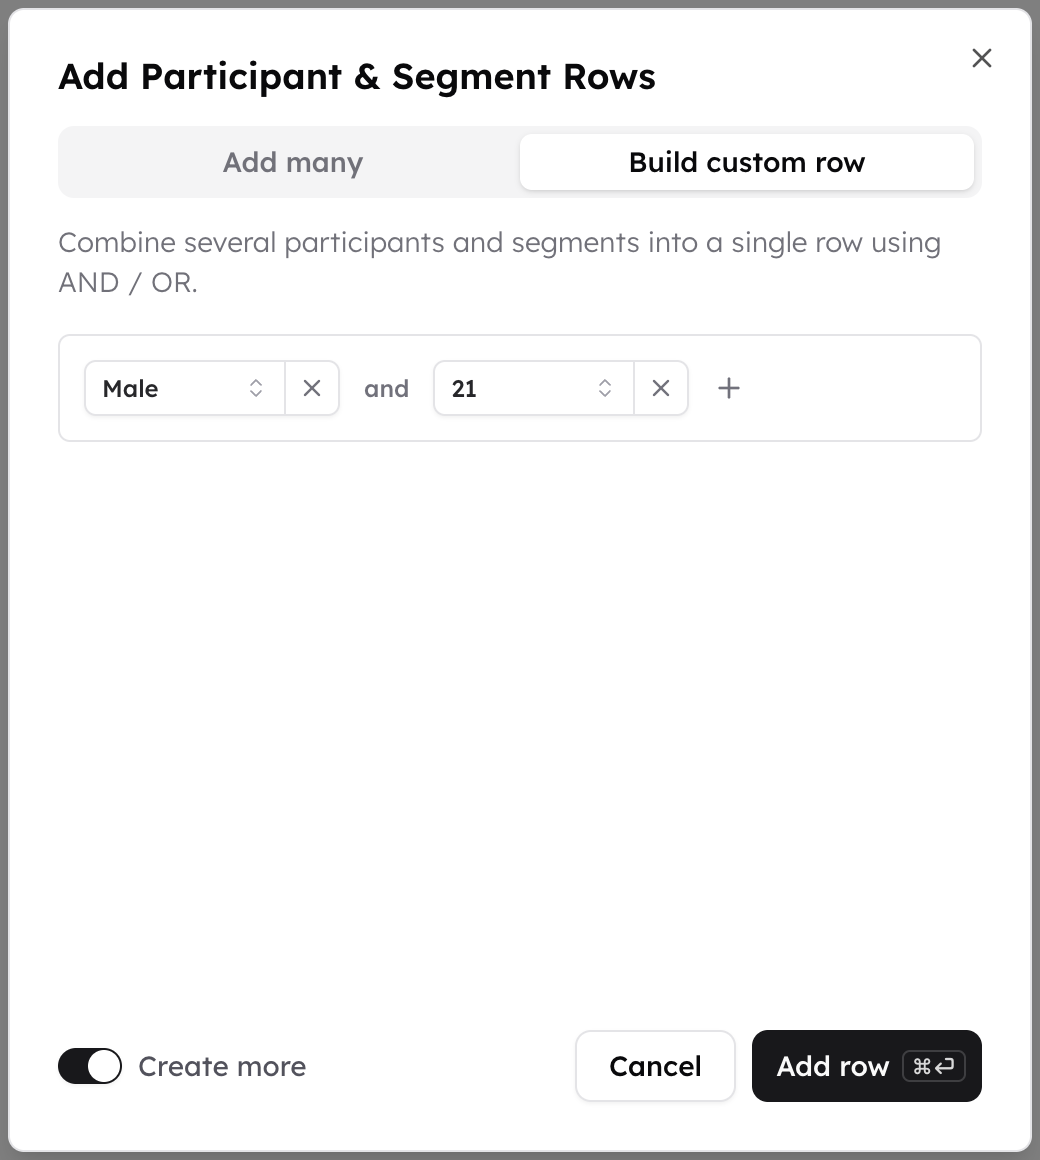
- Click Add Participant Rows and open the Build custom row tab.
- Select a segment or participant, then click + to add another.
- Click the AND or OR between the entries to change how they combine.
- Click Add row.
Manage rows
- Add a row inline — use the Add row cell at the bottom of the participant column, which has the same builder as the dialog.
- Reorder — drag a row by the handle on its left edge. Remove any sorting first; rows can’t be dragged while sorting is applied.
- Edit — hover over a row, open its three-dot menu, and click Edit row to change which participants and segments it covers.
- Delete — use Delete row in the same menu, or select several rows with their checkboxes and use Delete in the header bar.
- Show segments — each row lists the segments its participants belong to. Move them into their own column from the Display menu.
Rows that lose a participant or segment
A row remembers the exact participants and segments you gave it. If one of them is later deleted from the project, the row labels it Removed participant or Removed segment in place of the name. Two things commonly cause this:- Retranscribing a file. Retranscribing replaces that file’s speakers with new ones, so any row built on the old speakers no longer finds them.
- Deleting a segment that a row was built from.
- Hover over the row and open its three-dot menu.
- Click Delete row.
- Add a new row for the participants or segments you want to analyze instead.
Ask questions as columns
Each column is one question, asked of every row.- Click Add a Question Column at the bottom of the grid, or press ⌘K (Ctrl+K on Windows).
- Type your question.
- Choose the output type, and add labels if you picked Categorization.
- Press Enter, or click Add column.
Output types
A Categorization column needs at least two labels — the set CoLoop chooses from when it codes each row. Pick Categorization in the composer and the Labels row appears, where you can either:
- Ask CoLoop for a starting set — click Suggest labels and CoLoop drafts a set from your question. Write the question first: the button stays disabled until there’s enough to work from.
- Write your own — click Add your own, then the + to add each label after that.
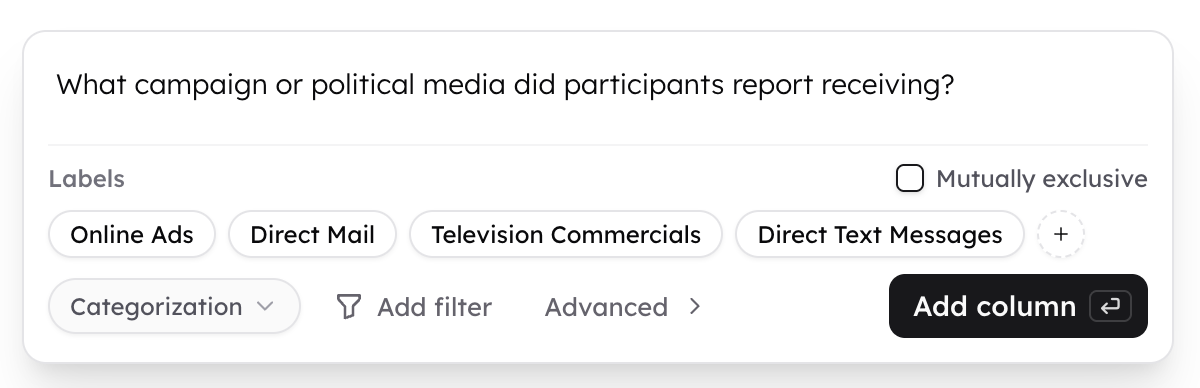 Suggest labels disappears once a label exists, so to re-draft a set, remove the labels you have. For a bigger codebook, open Advanced: the full editor lists each label with its criteria on its own line, and accepts a comma-separated or line-separated paste to add many at once — any pasted label with an unsupported character is skipped, and CoLoop tells you how many were left out.
Narrow a column to specific data
Click Add filter in the composer menu to limit the question to certain files and concepts. Leave it empty to analyze all of the project data. This is per column, so one grid can hold a question about a single concept next to a question about several concepts. Row filters and column filters do different jobs: row filters decide whose data is analyzed, and column filters decide which of their data is analyzed.Set a custom overview, or skip it
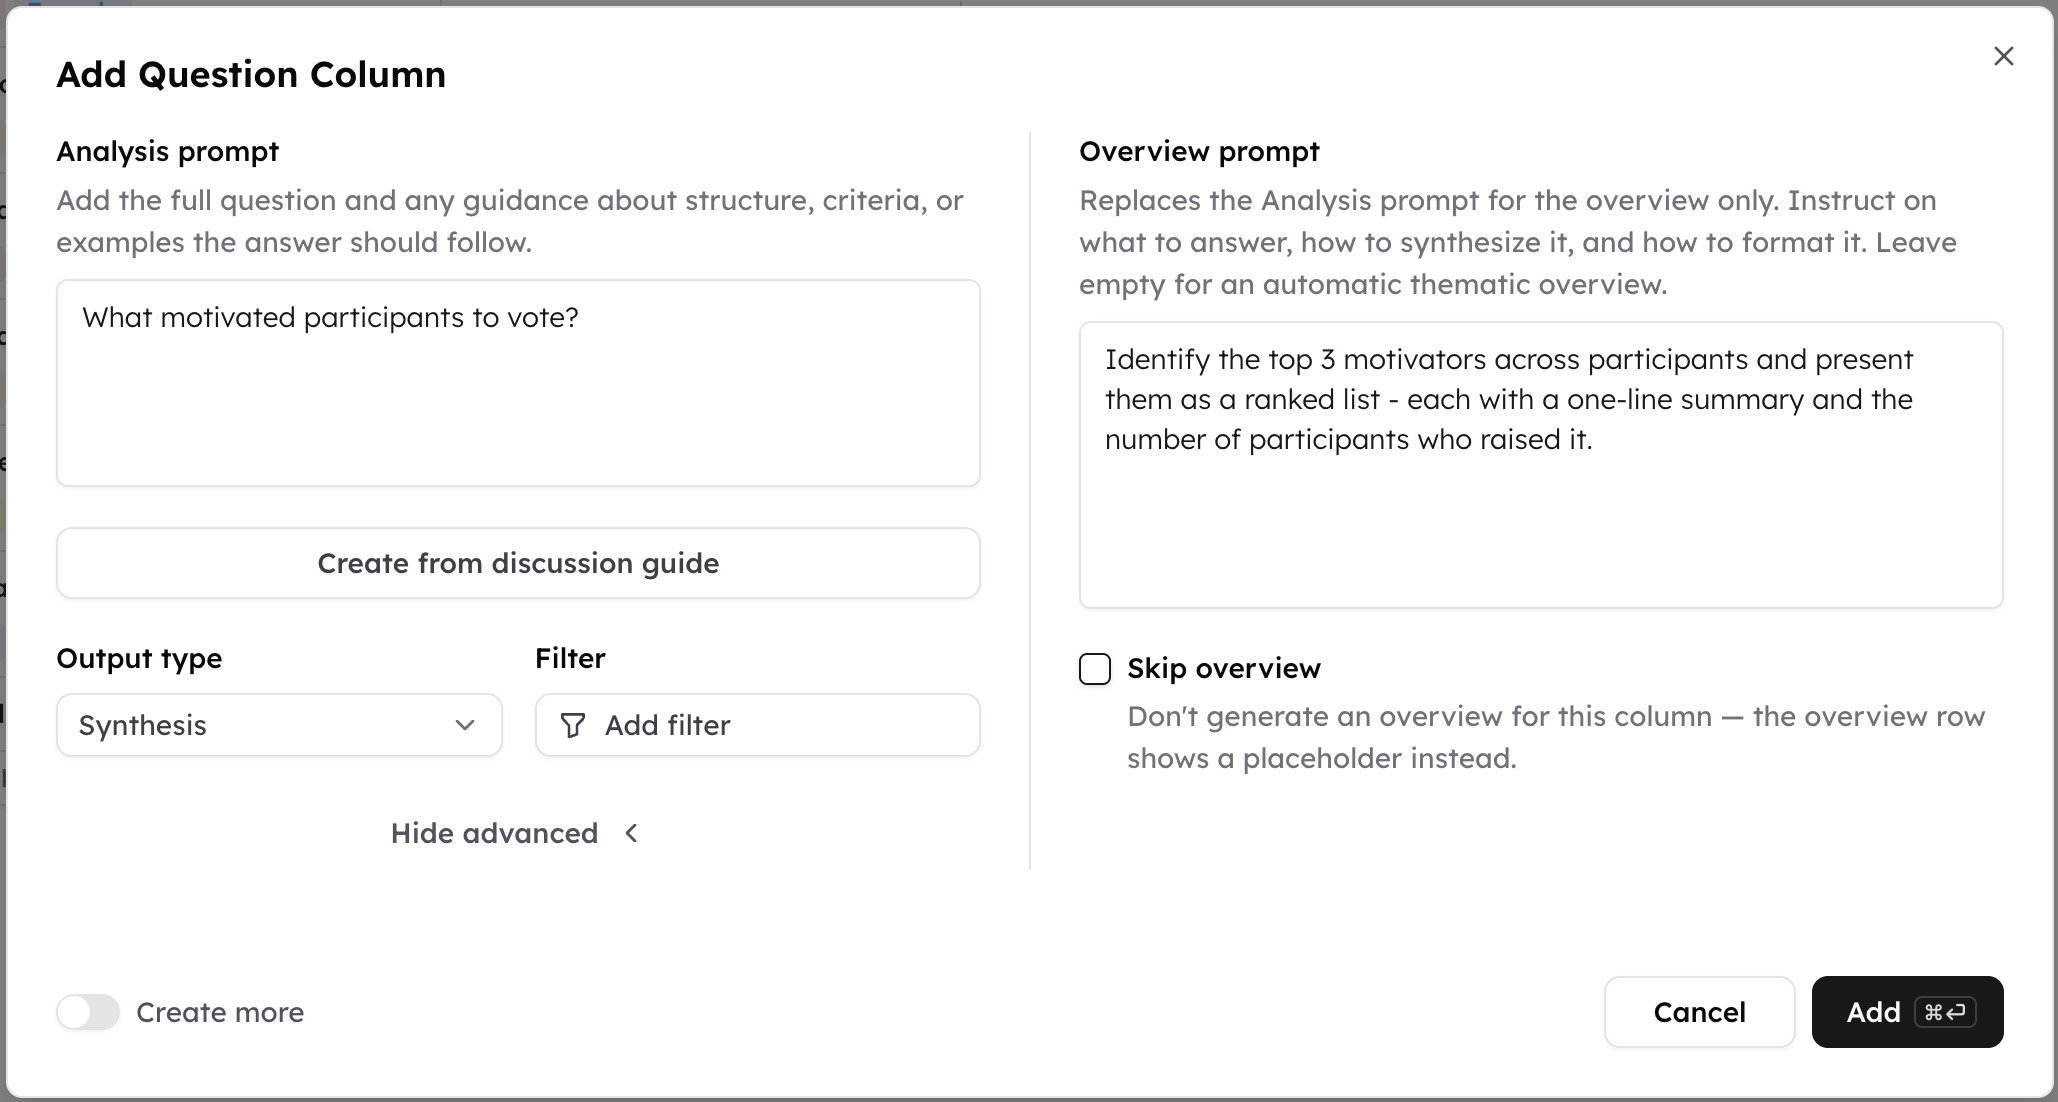
Click Advanced in the composer menu, or Show advanced in the add-column dialog, for the per-column overview controls:- Overview prompt — replaces your question for the Overview row only. Use it to say what the summary across rows should answer and how it should be formatted. Leave it empty for the automatic thematic overview. Available on Synthesis columns only.
- Skip overview — leave the Overview cell empty for this column. Available on every output type, and off by default, so every column gets an Overview. On a Quotes only column the Overview is a synthesized thematic summary of the quotes across rows, while the per-row cells stay verbatim.
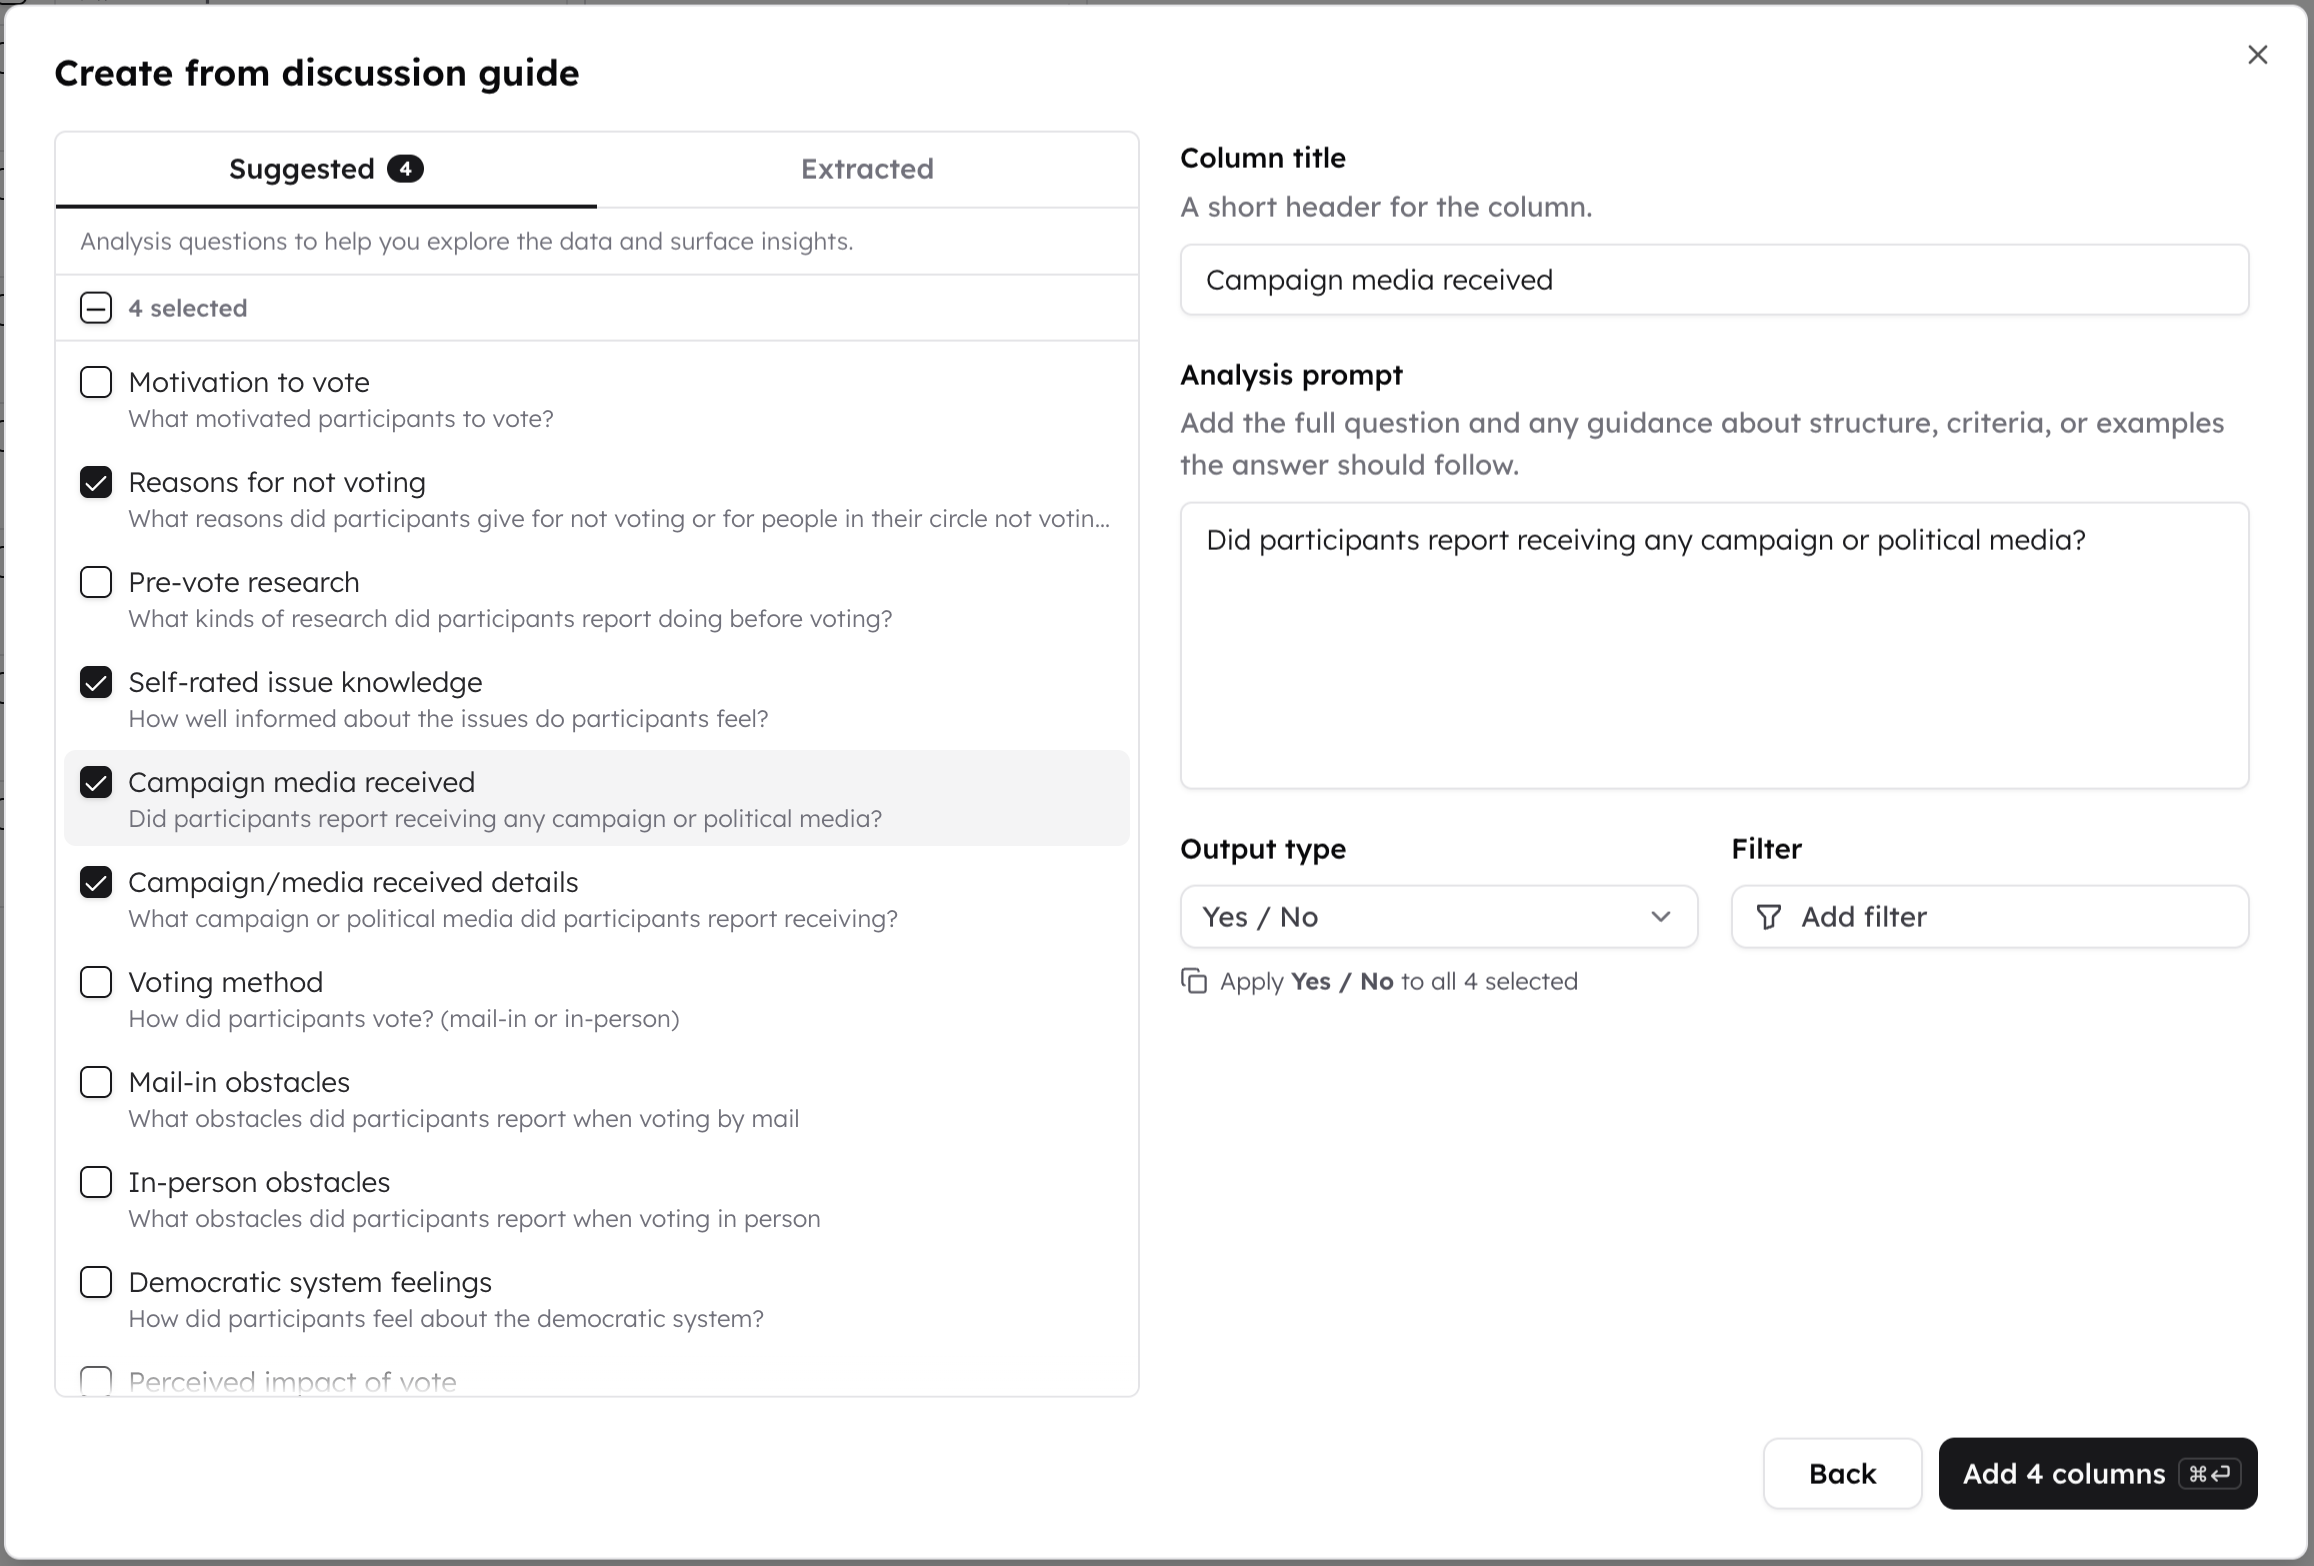
Add columns from your discussion guide
Suggested questions come from the discussion guide you added during project setup. CoLoop intelligently groups these questions based on similar themes present in the guide.
- Choose questions from the Suggested tab, or from Extracted for the exact questions written in your discussion guide.
- Click a question to review it on the right, and adjust its title, prompt, output type, labels, or filter before adding.
- Every selected question will be added as a column.
Manage columns
Click a column header to open its menu:- Edit column — change the question, output type, labels, filter, or overview settings. Editing recomputes the column.
- Insert left / Insert right — add a new column next to this one.
- Duplicate column — copy the question and its settings into a new column to tweak.
- Delete column.
Read the results
Cells compute as soon as you add or edit a row or column, and recompute whenever you change something that affects them. You don’t need to trigger anything. While a grid is working, cells fill in as their answers land. Cells load as you scroll, so a large grid still opens quickly.The Overview row
The Overview row answers each column across every row in the grid. It appears once the grid has more than one row. When no row in a column had anything in scope, the Overview carries the same no-data message its cells do. What you see depends on the output type:- Synthesis columns get a thematic breakdown with the number of participants behind each theme — or your own summary if you set an overview prompt.
- Numeric columns get a single reduced value, such as an average or a total, with an explanation backing this value.
- Yes / No and Categorization columns get a distribution across participant of the count and percentage for each value.
When an Overview reads “Not computed”
An Overview answer covers an exact set of participants. Changes that happen outside the grid leave an Overview with no answer. Adding or removing a participant from a segment a row is built on, or a participant disappearing when their file is retranscribed, both move who the Overview covers. It then reads Not computed, rather than showing an answer that no longer matches the rows beneath it. Hover the cell and click Compute grid to produce it. That button computes the whole grid, not just the one Overview. It is the same action as Compute grid in the grid header, so it also picks up anything else outstanding — cells that never computed, or that failed.Look at one cell or one row in detail
Click any cell to open the details panel. It shows the row’s filter, the full untruncated output, and — for Yes/No and categorization cells — the participant distribution. Click a bar in this distribution to see the individual participants’ answers determining that value. After selecting a cell, use the arrow keys to move to the next cell in that direction. The details panel follows your selection. If focus is on a control inside the cell, such as a citation, the arrow keys continue to control that item. To read one participant’s responses across every question, hover over their row and click Open. The row panel lists every column’s answer for that row.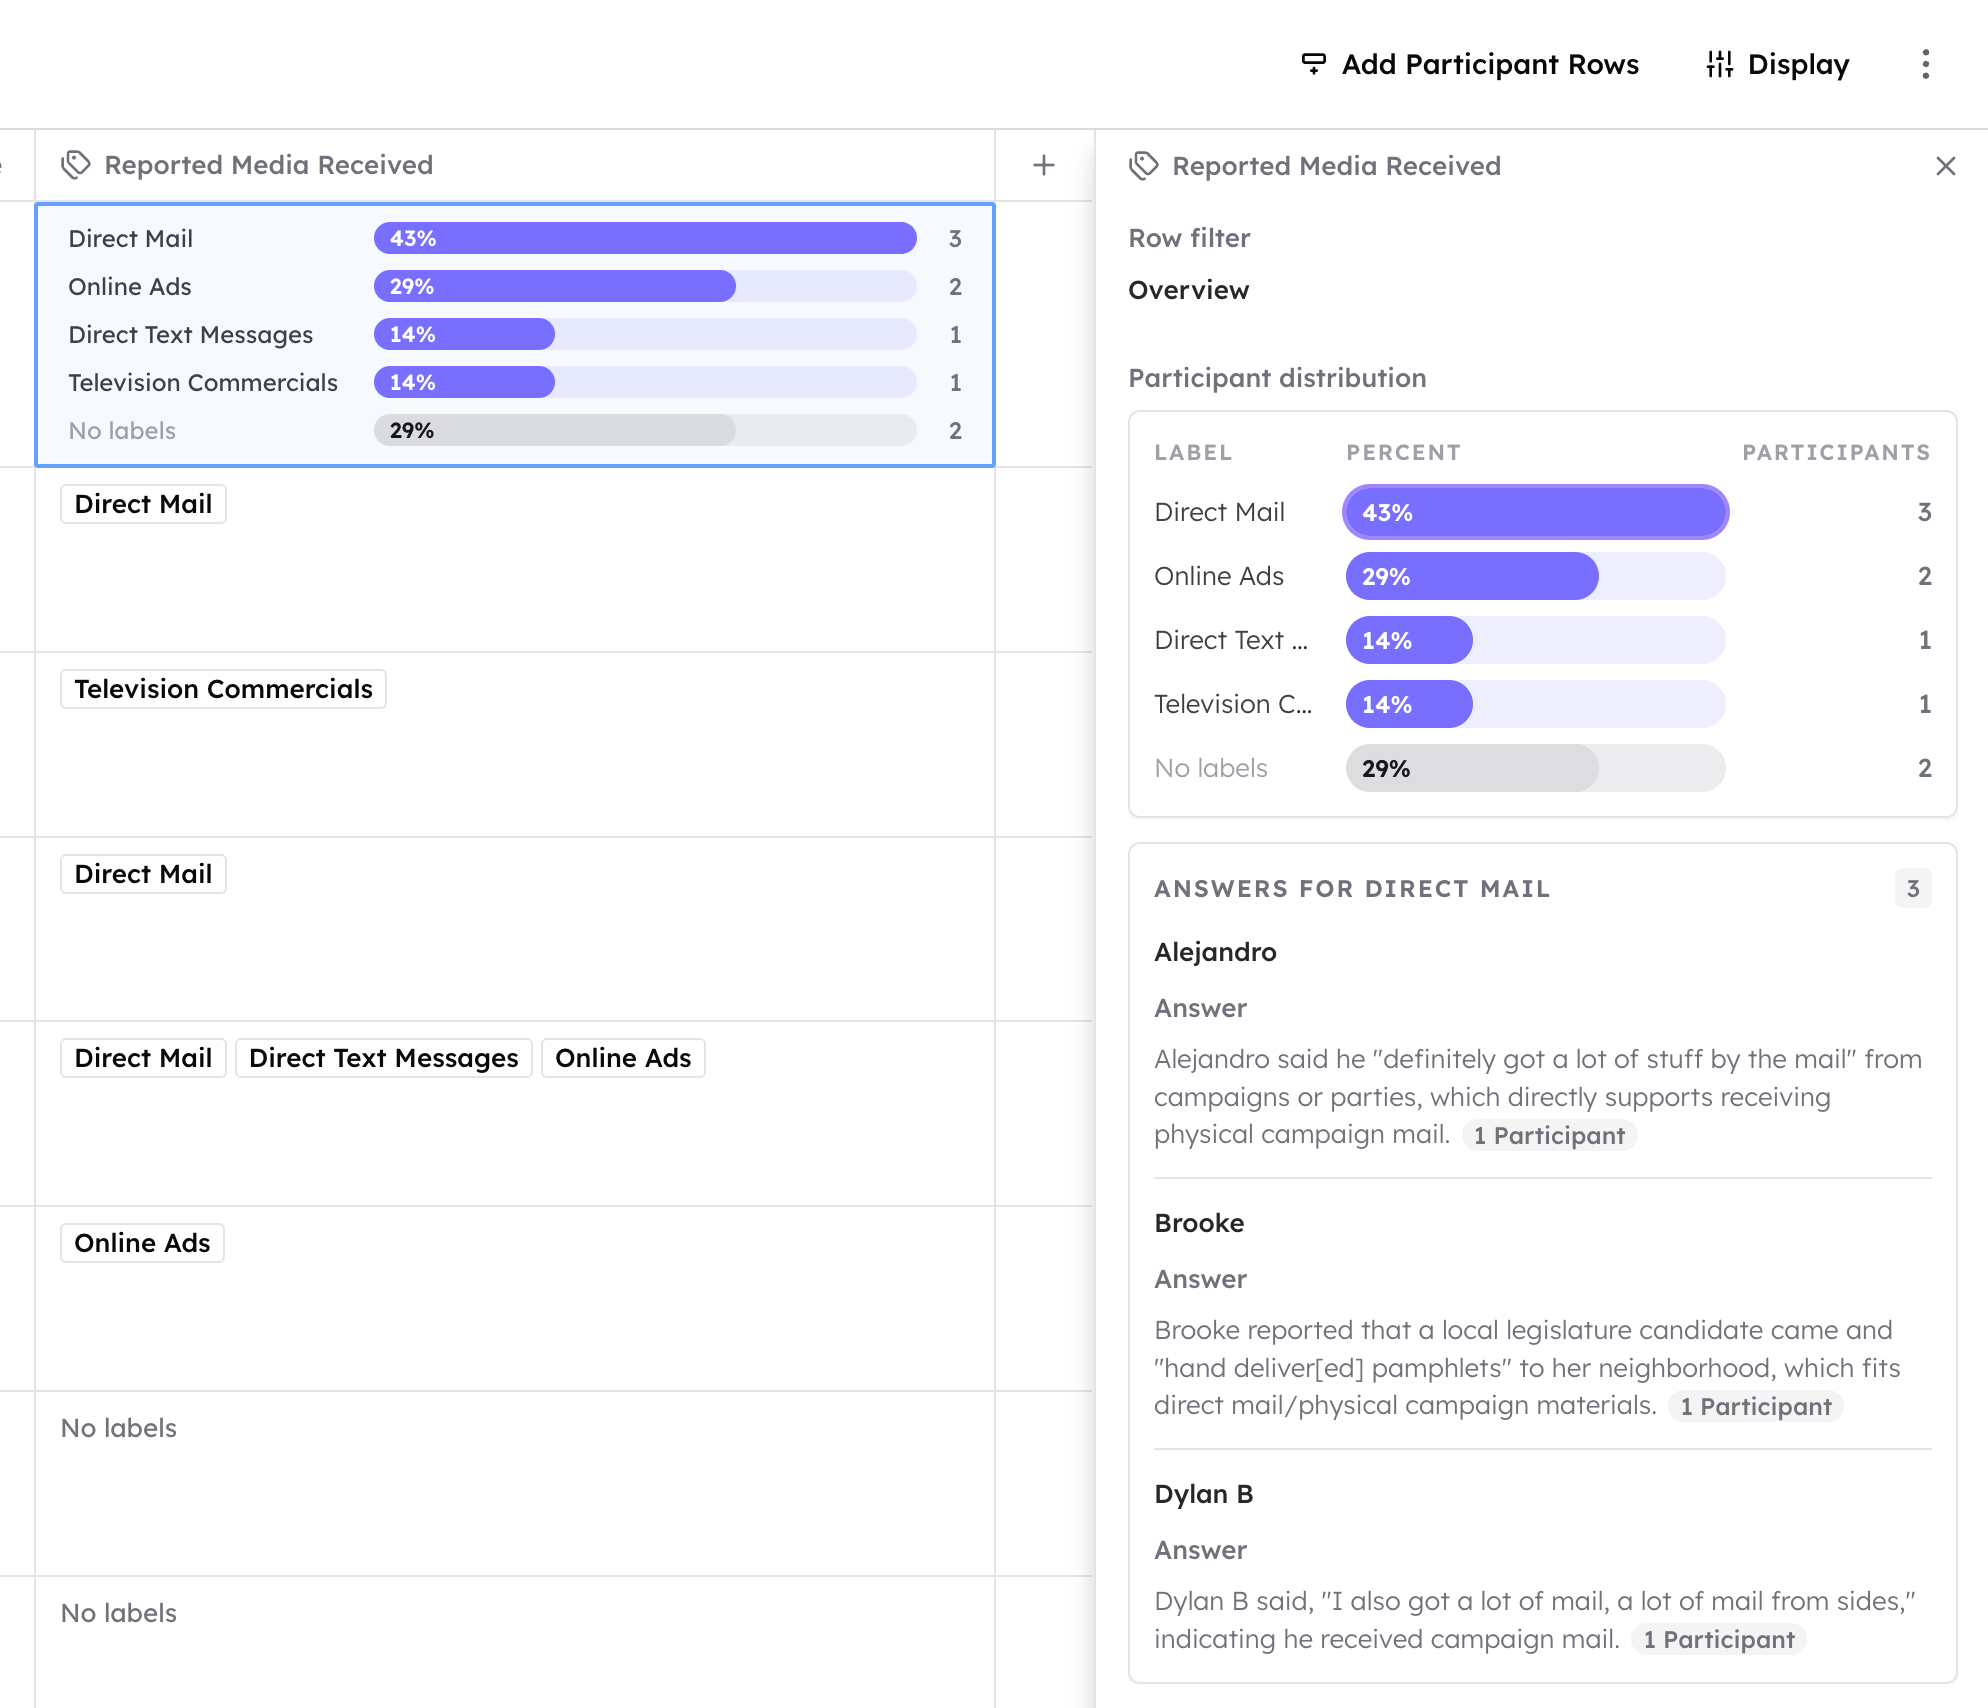
Check the evidence
Every generated answer is cited. Click a citation to open the Citation sources panel, expand a quote to read it in context, click Open to jump into the transcript, or turn the quote into a clip. For more on working with evidence and clips, see Evidence Panels and Creating Clips and Reels.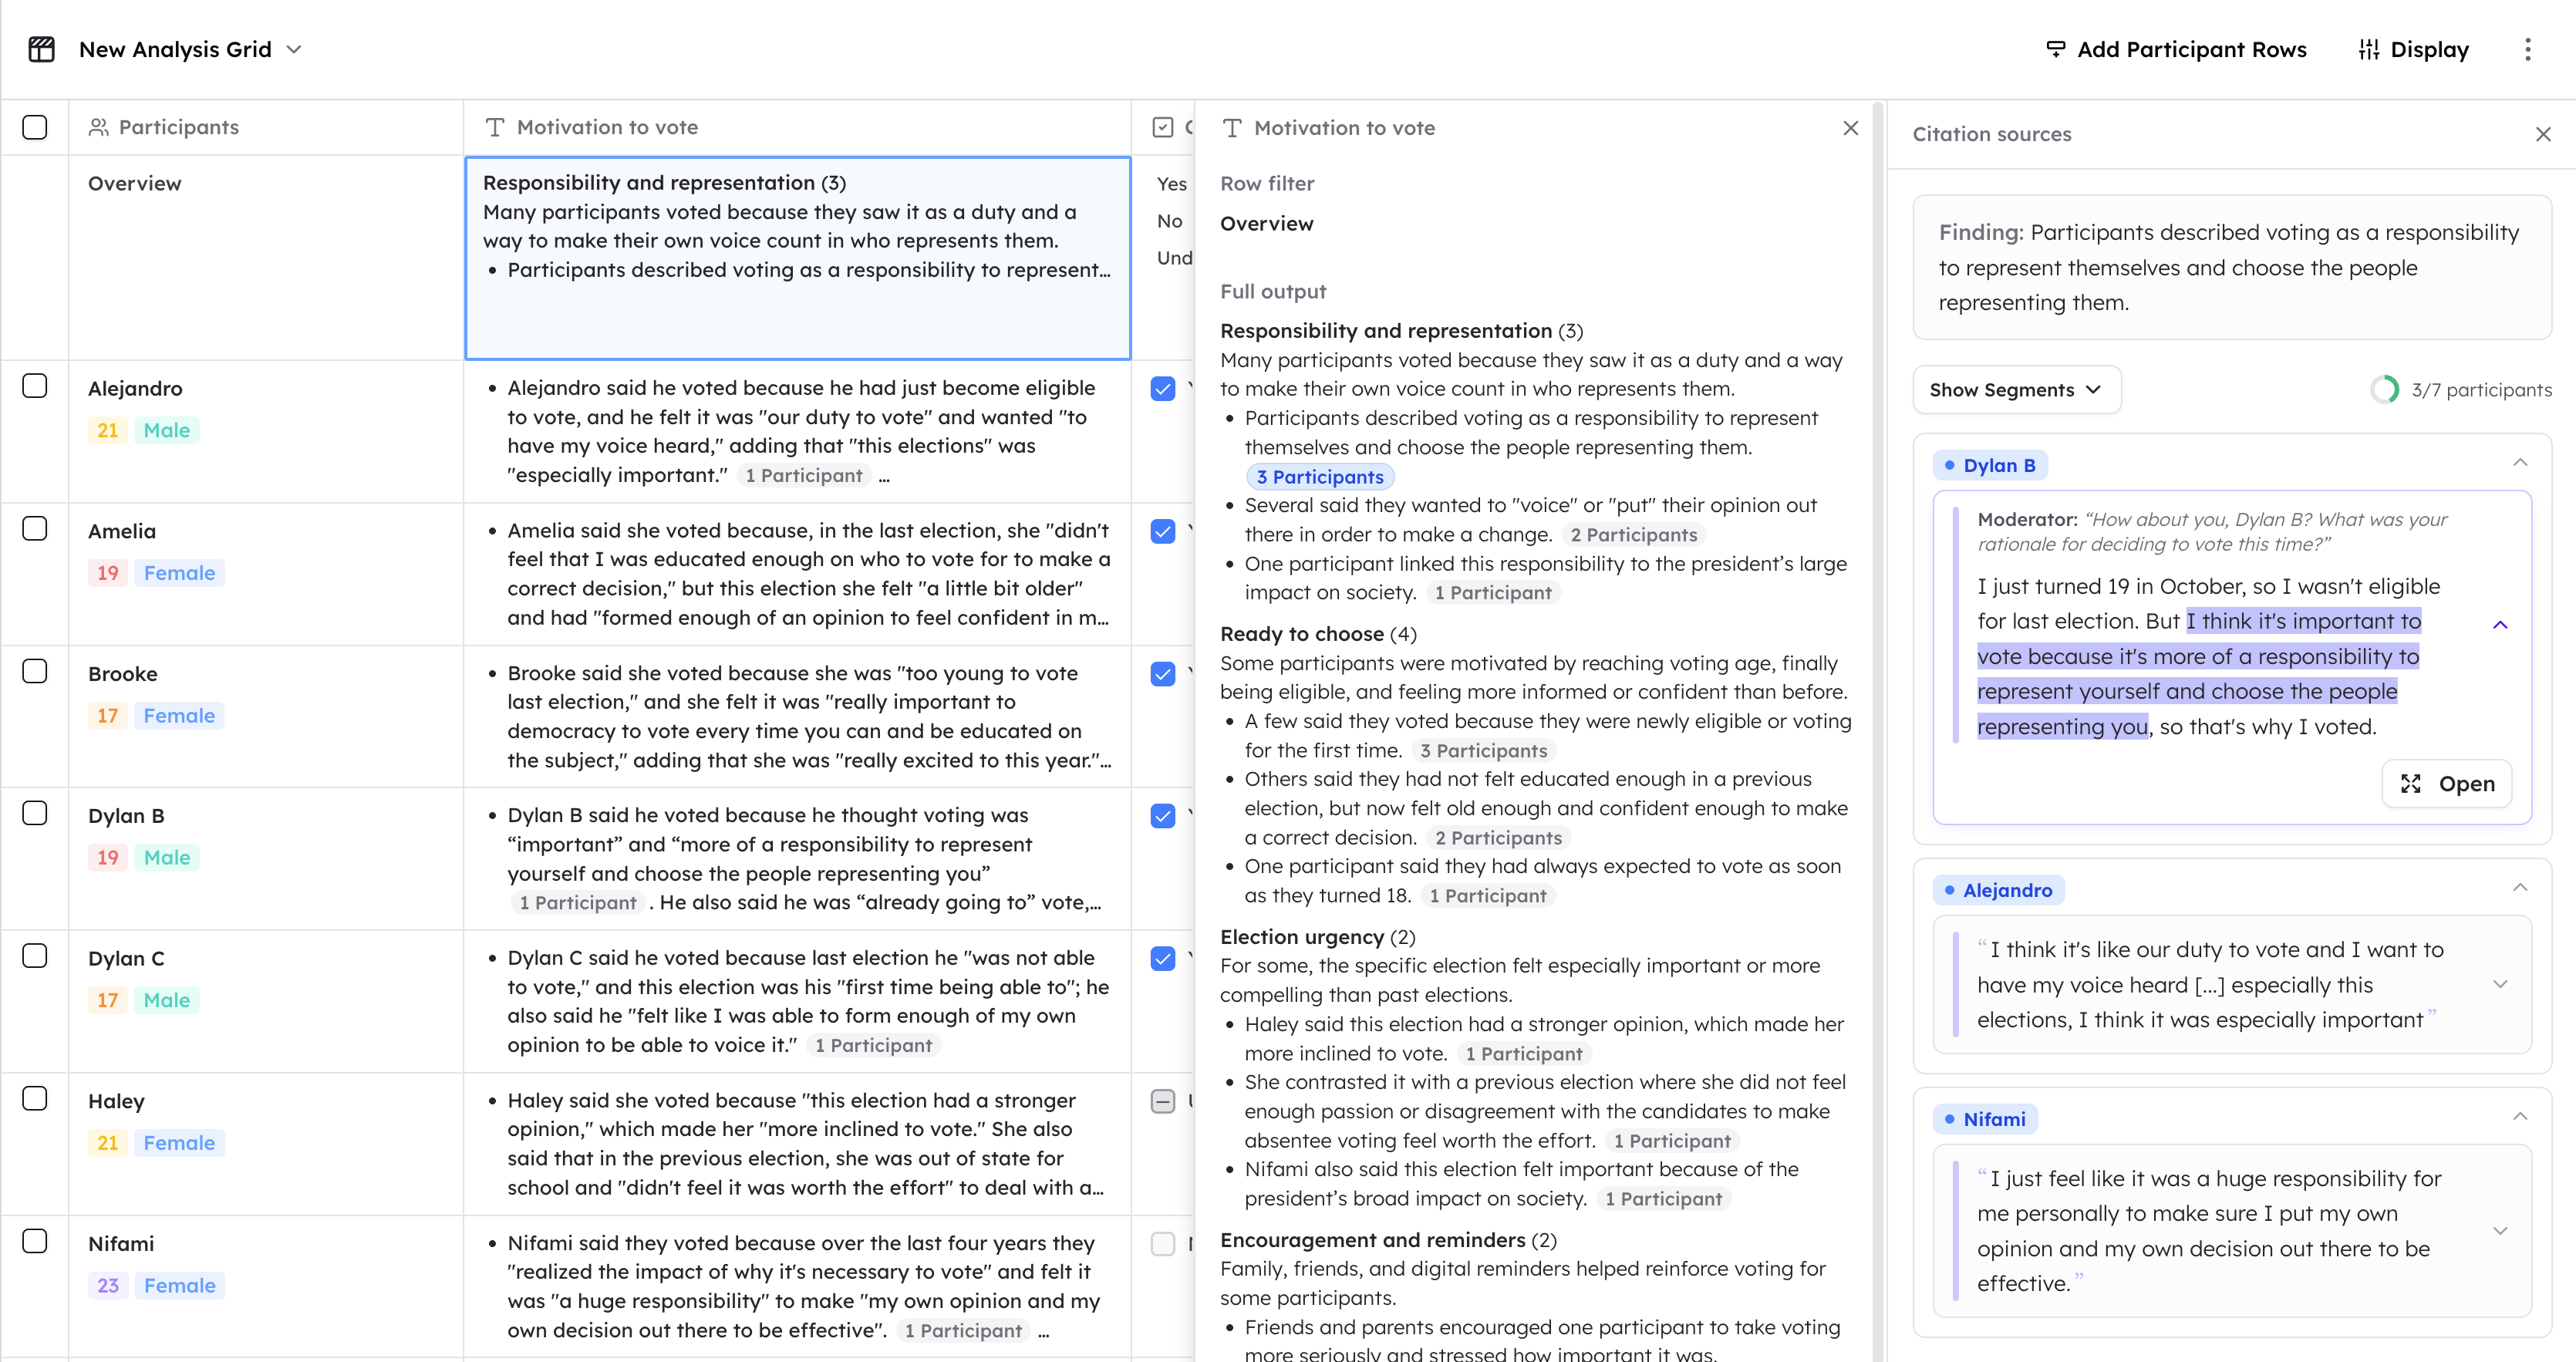
Sort and filter what you see
Hover over a column header to reach its sort and filter icons, or add a rule from the bar above the grid.- Sort — sort rows by any column, ascending or descending.
- Filter — filter by participant, by segment, or by the values in a Yes / No or Categorization column. Yes/No filters by Yes, No, or Undetermined; Categorization filters by label.
- + Filter adds another rule, and Reset clears every rule.
Overviews for a filtered view
A column overview summarizes every row, so it would misrepresent any filters applied. When a filter narrows the rows, the Overview row becomes Filtered overview and its cells read Not computed until you ask for them. Click Compute on the Filtered overview row, or on an individual cell, to summarize exactly the rows you’re looking at. Results are kept, so returning to the same filter shows the summary again without recomputing. Some subsets can’t be summarized, and the cell says why: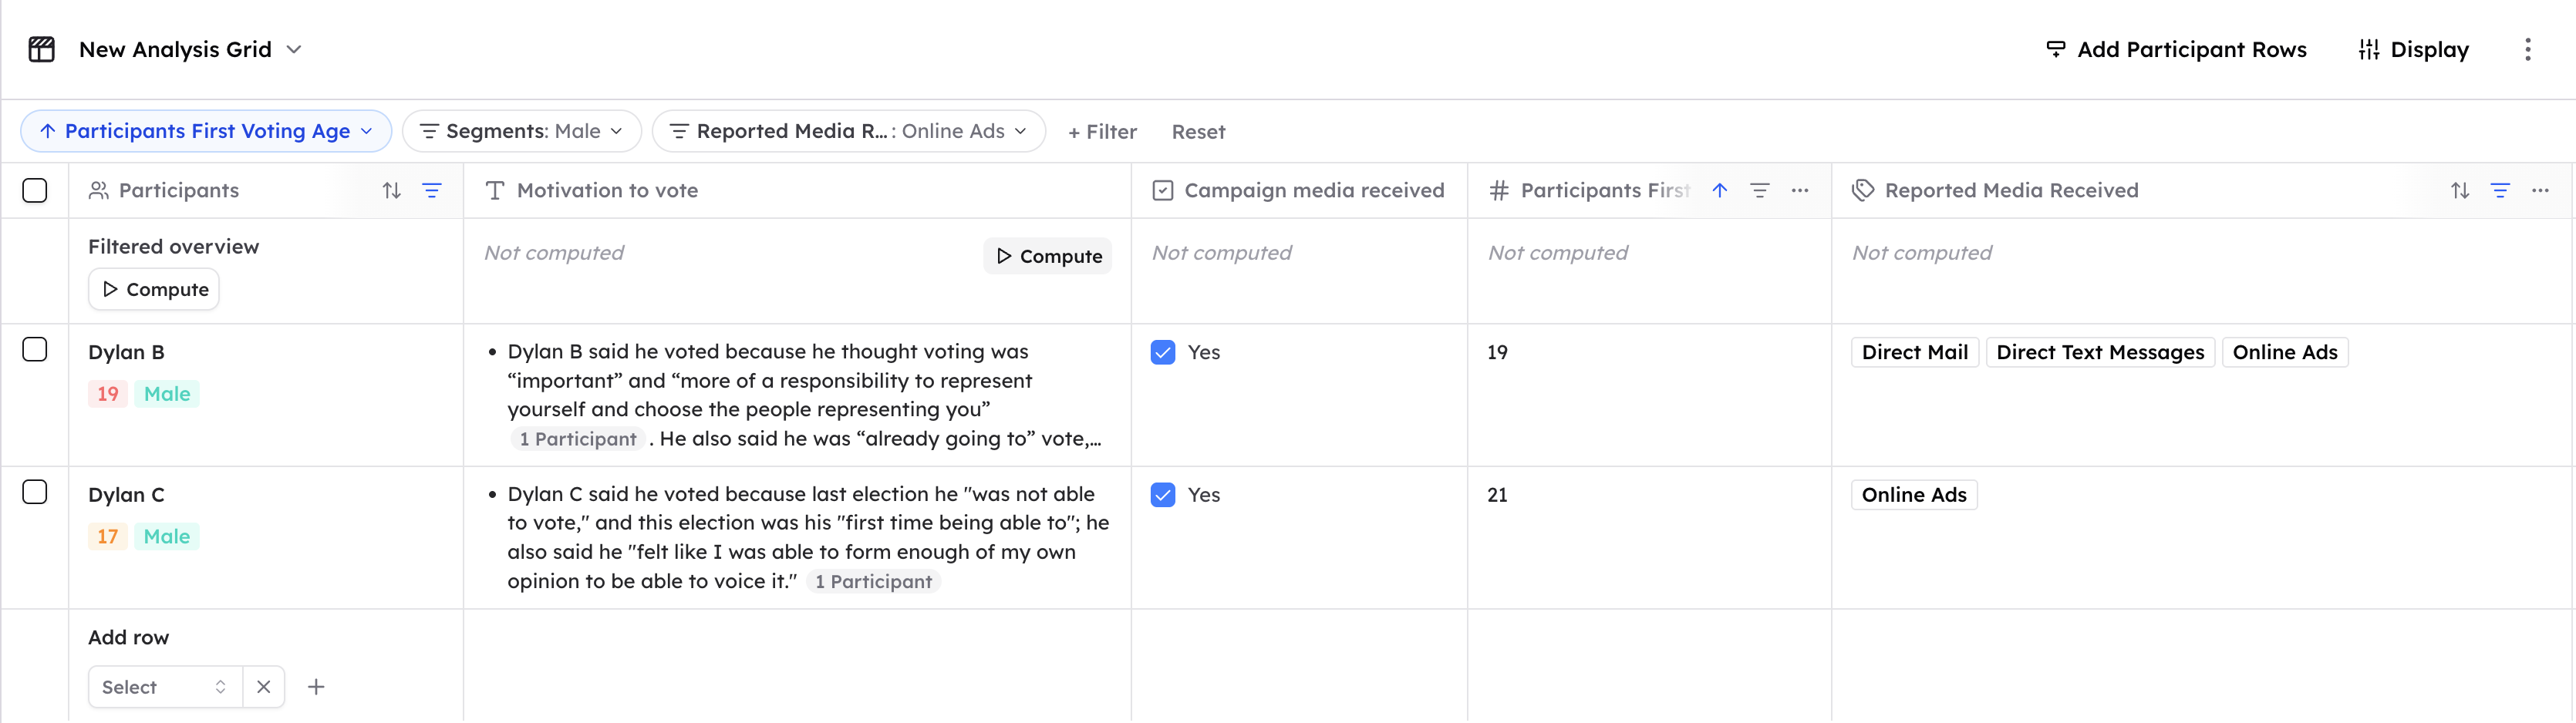
Recompute a grid
Grids recompute themselves as you edit them, so you rarely need to do this by hand. When you do — after a run of failures, for example — open the three-dot menu in the grid header and click Compute grid. CoLoop picks up anything that hasn’t succeeded and leaves finished cells alone. If there’s nothing outstanding, it tells you so.Change how the grid displays
Display preferences are saved to your account, so they will be set as the default on any device you use and apply to all grids in every project. The first time you open an analysis grid, CoLoop allows you to choose these default display settings. Welcome to Analysis Grids presents each preference next to a mock grid that shows the change as you make it. Click Save to keep your choices, or Skip for now to start with CoLoop’s default settings. To change them later, open Display in the grid header. Editing a setting there applies immediately. For the descriptions and the mock grid, click Display settings at the top of that menu — choices in the panel are written when you click Save, and Cancel reverts whatever you changed.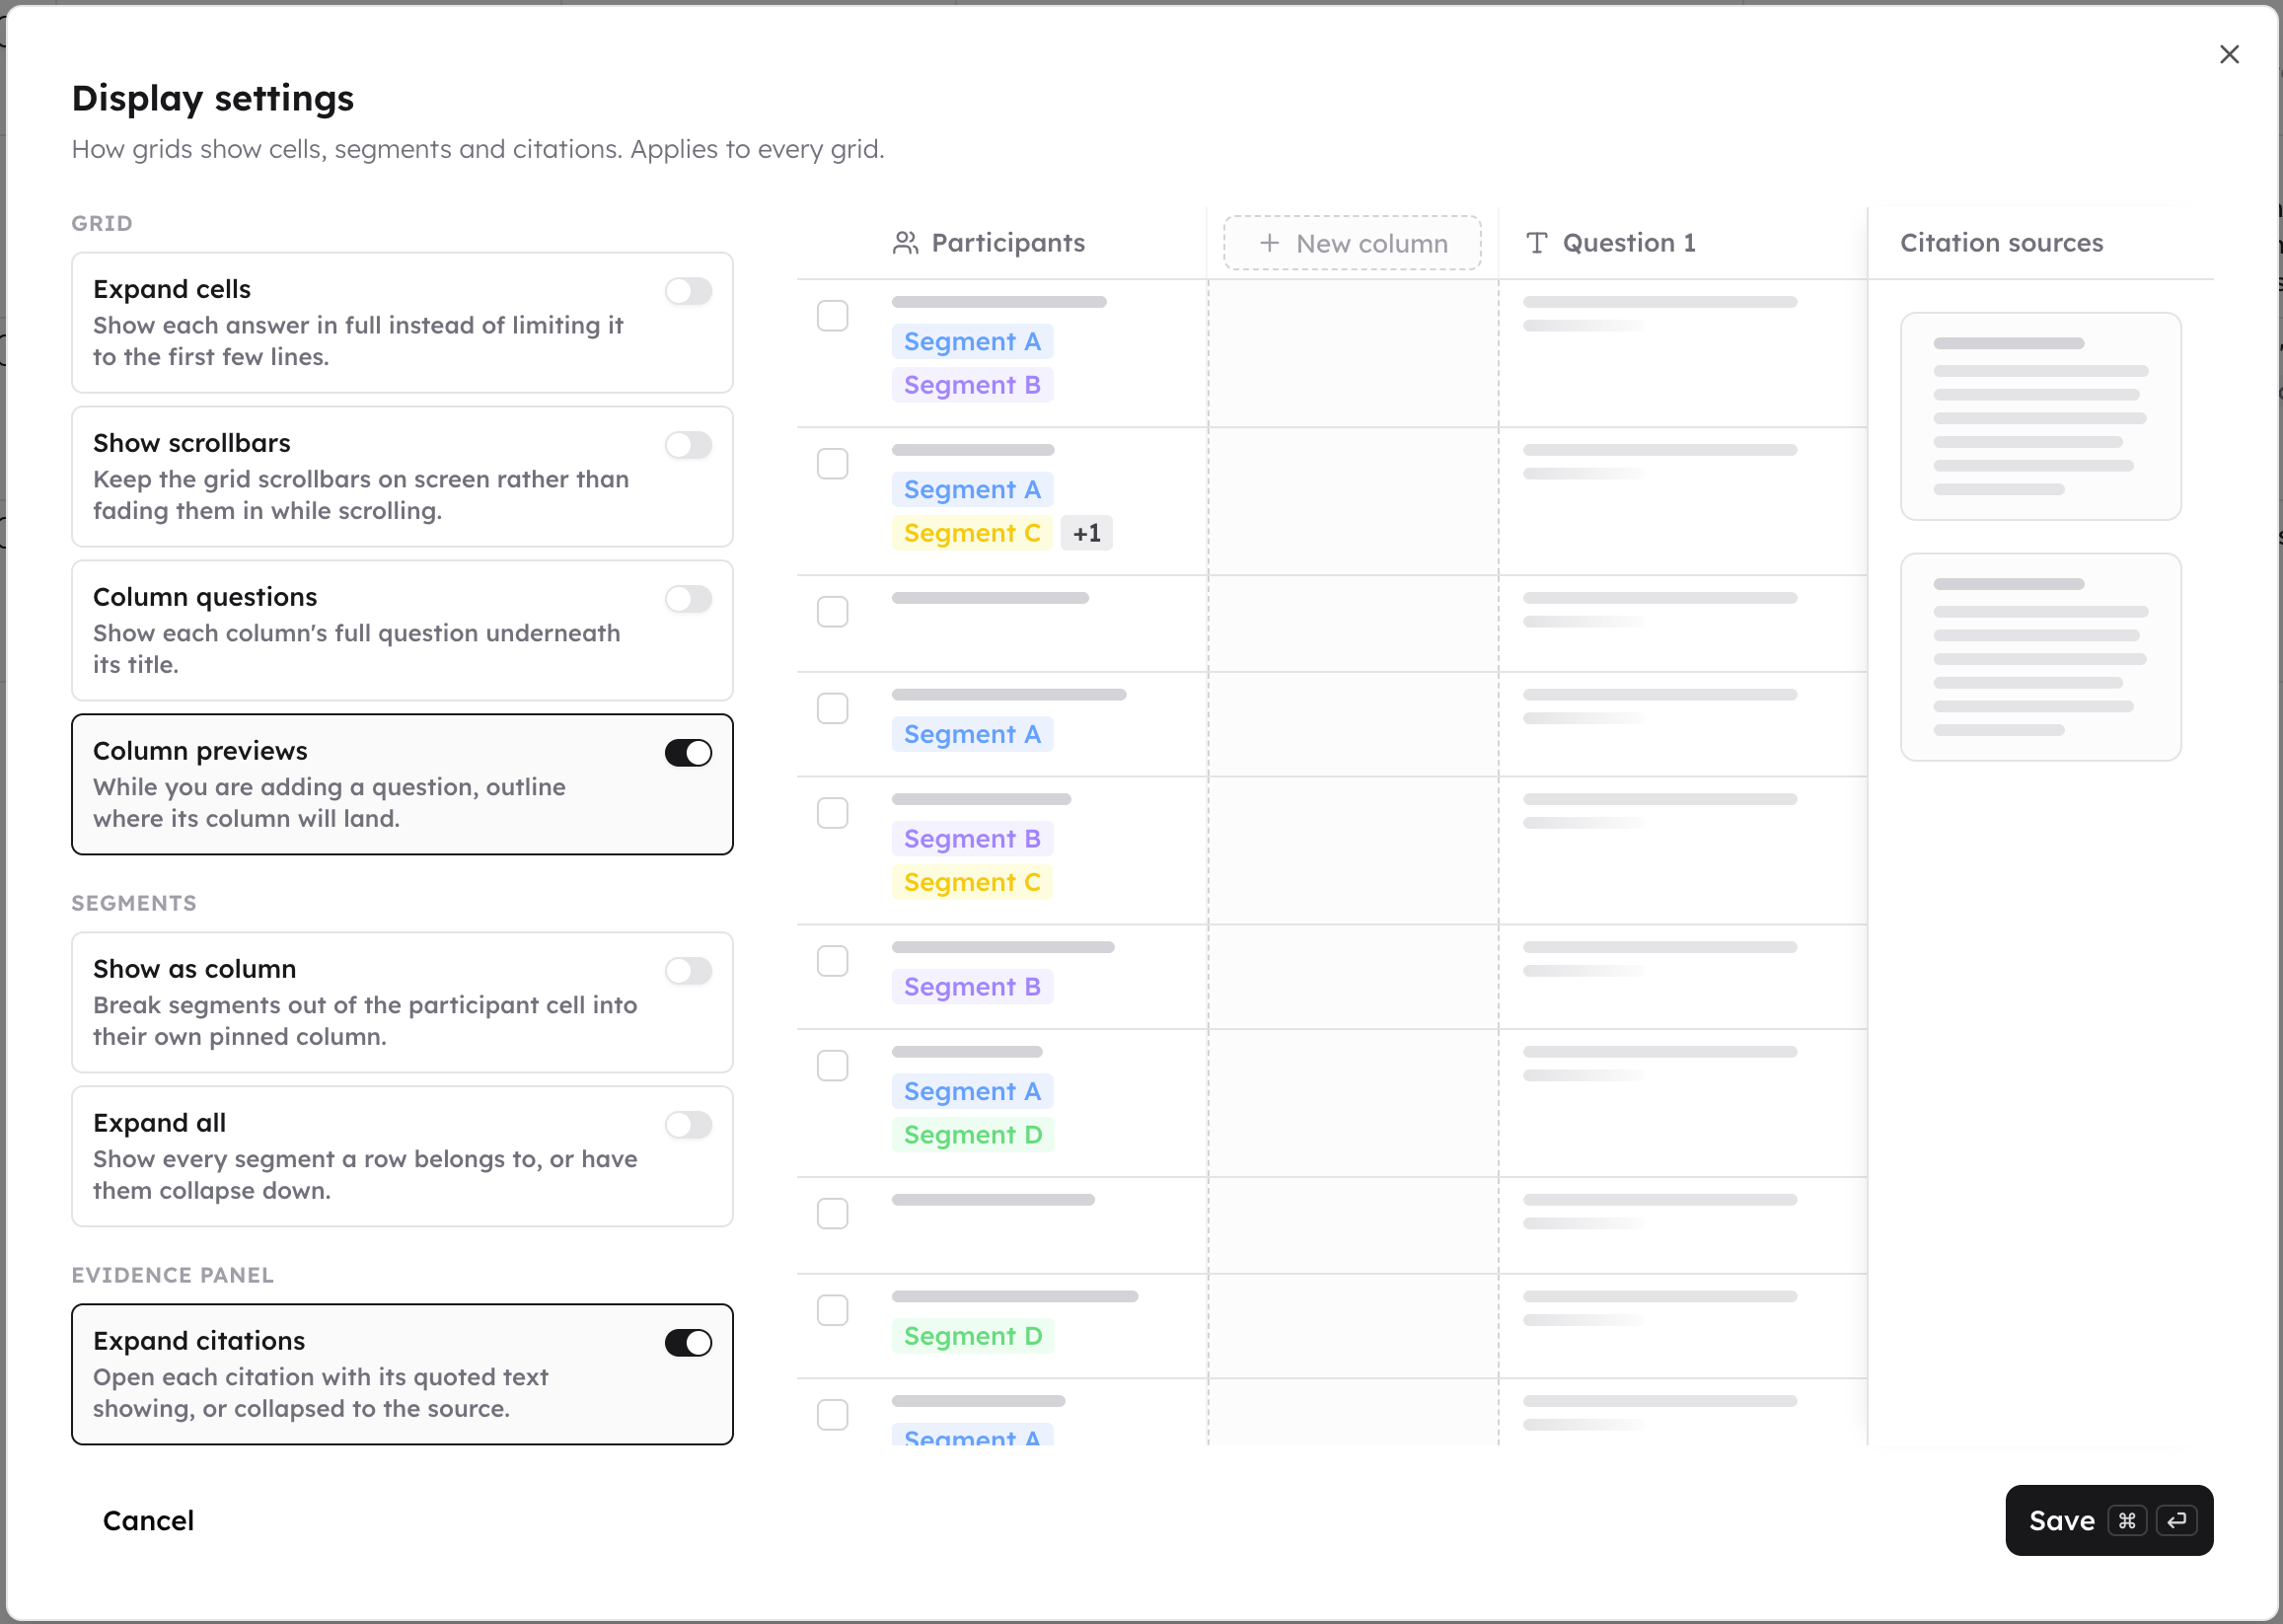
Fit more on screen
When a grid has many columns, three controls give you more room. These stay on the device you set them on rather than following your account.- Zoom: scale the whole grid from 20% to 160% with the minus and plus buttons in the Display menu.
- Full screen: hide CoLoop’s navigation so the grid fills the window. Click the header button again, or leave the grid, to bring it back.
- Collapse the participant columns: click the collapse arrow on the Participants header to fold the left columns into a thin rail. Click it again to expand.
Export, rename, and share
Open the three-dot menu in the grid header for:- Export — download the grid as an Excel file (XLSX), with a column of participants, their segments, the Overview row, and one column per question.
- Manage access — control who can see and edit the grid. See Sharing analysis grids and AI chats.
- Rename.
- Delete.