

Adverse event detection is in beta and is switched on per workspace. If you don’t see Adverse events in your project’s side menu, ask your CoLoop contact to enable it.
- Adverse event: an untoward medical occurrence in a patient.
- Product complaint: a fault with the product or its packaging, rather than its effect on the patient.
- Special situation: off-label use, overdose or misuse, pregnancy exposure, lack of efficacy, medication error, withdrawal and the other enumerated situations.
Before you start
- Upload your files and create transcripts. Detection reads finished transcripts only: audio, video and text files that have completed processing.
- You need edit access to the project to add products, run detection, record verdicts and change the report form. Viewers can read cases but not decide them.
Choose how to start
In the project side menu, under Analysis, click Adverse events. Before detection has run in a project, the page offers two ways to start.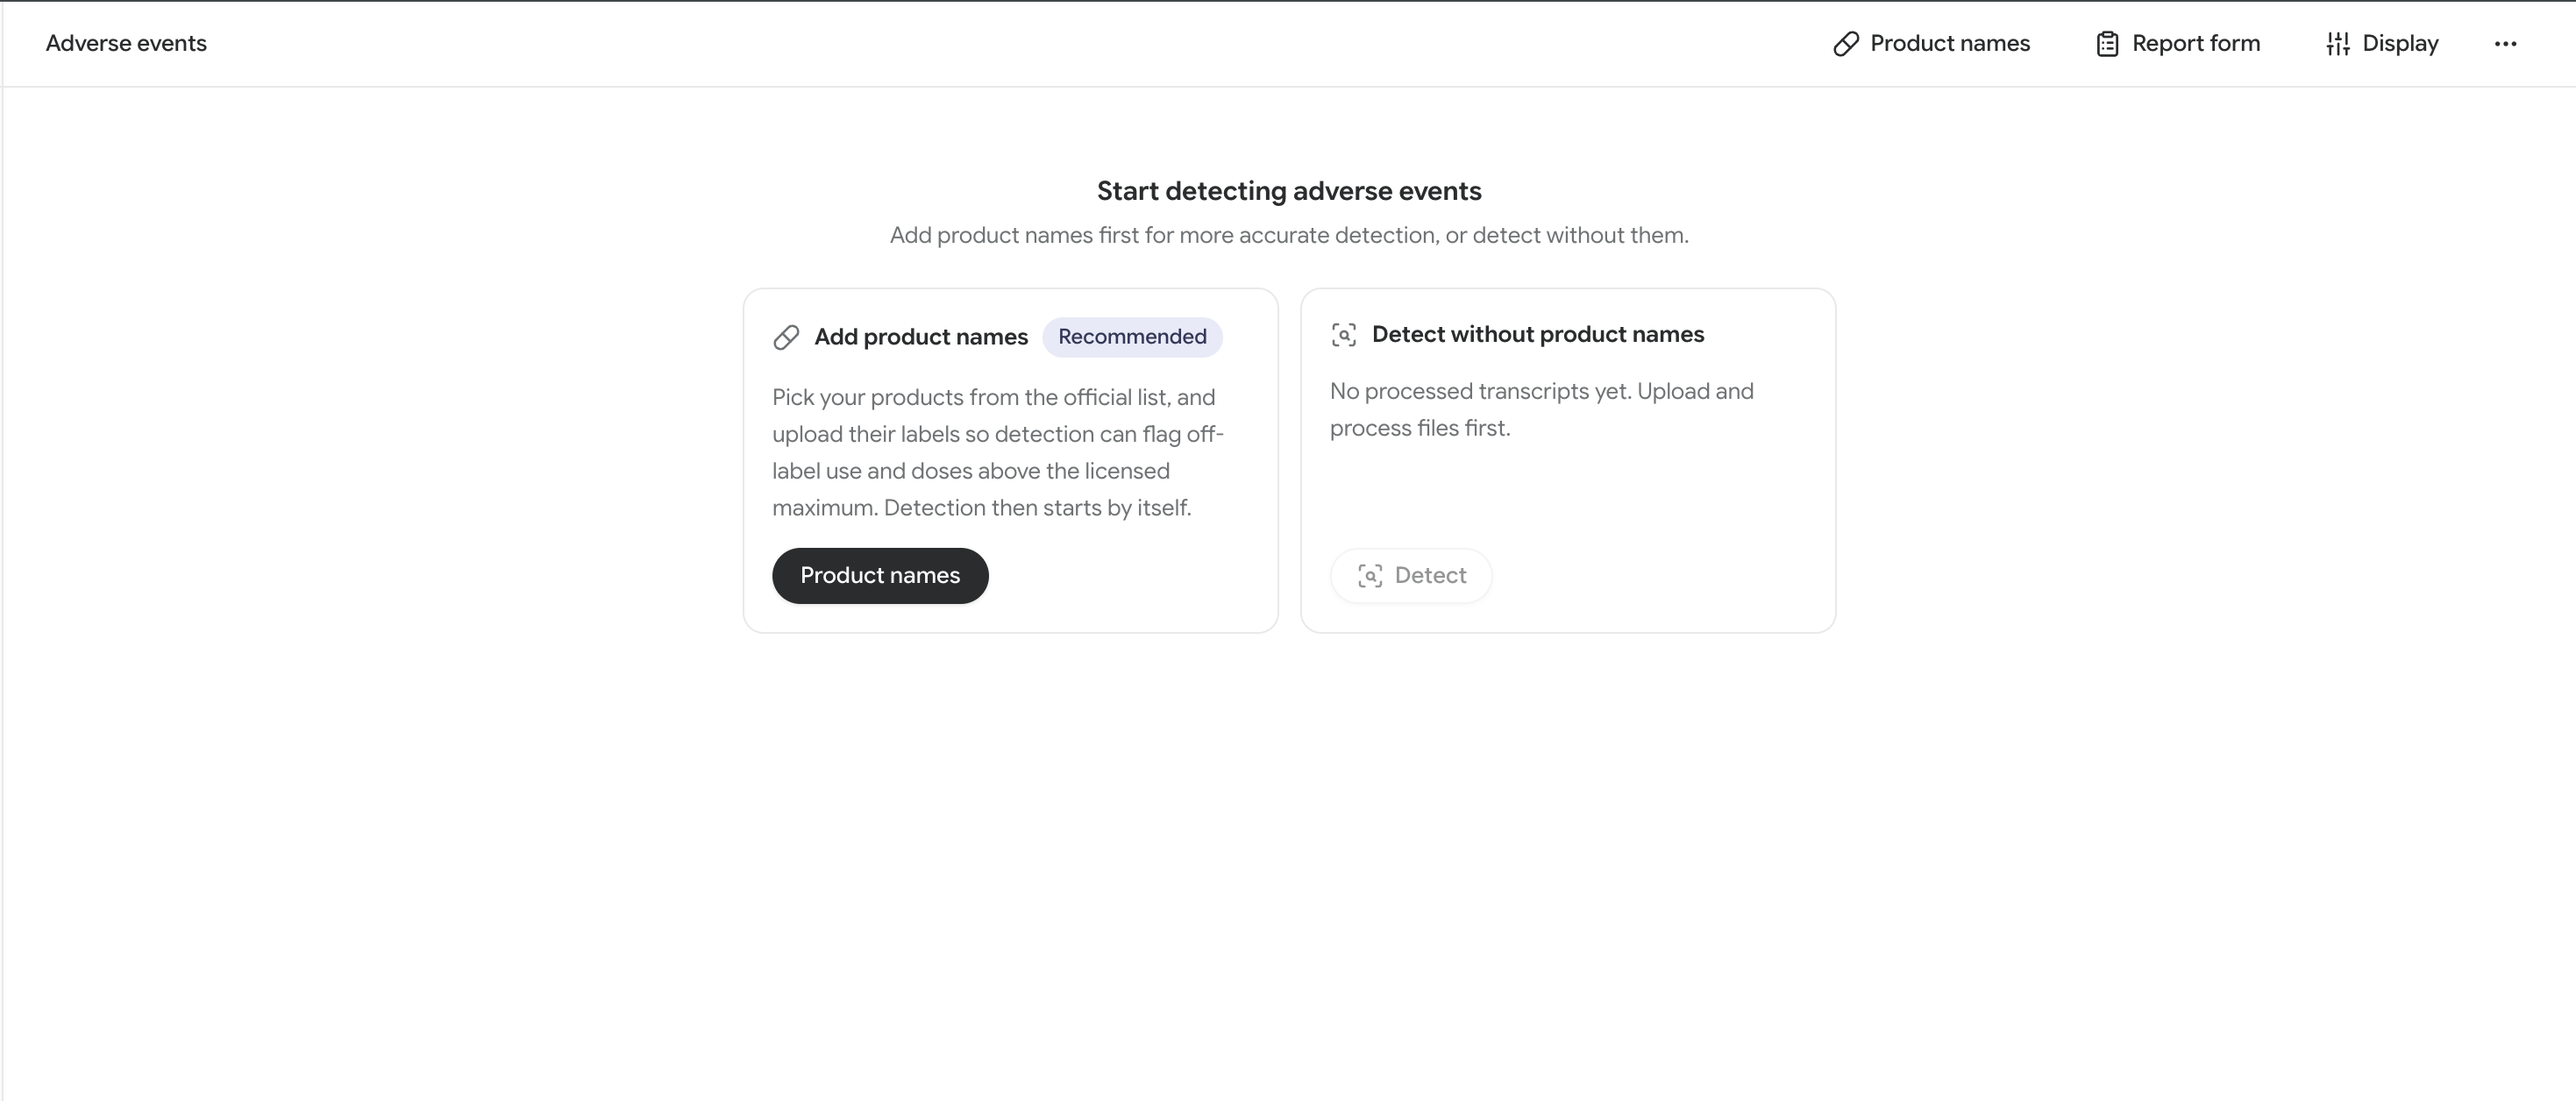
- Add product names if you know which products your study covers. Detection then knows which products to look for. If you also upload their labels, it can raise off-label use and doses above the licensed maximum. Detection starts on its own when you close the dialog after adding your first products.
- Detect without product names if you don’t know the products yet. Detection still finds adverse events, product complaints and special situations, but it can’t judge use against a license it doesn’t have.
Add products
Add each product in your study by picking it from an official list or typing its name. Then upload its label, or enter its details yourself, if you want detection to judge off-label use and doses. A project can have up to 30 products. Click Product names in the start card, or at the top right of the page, to open the dialog.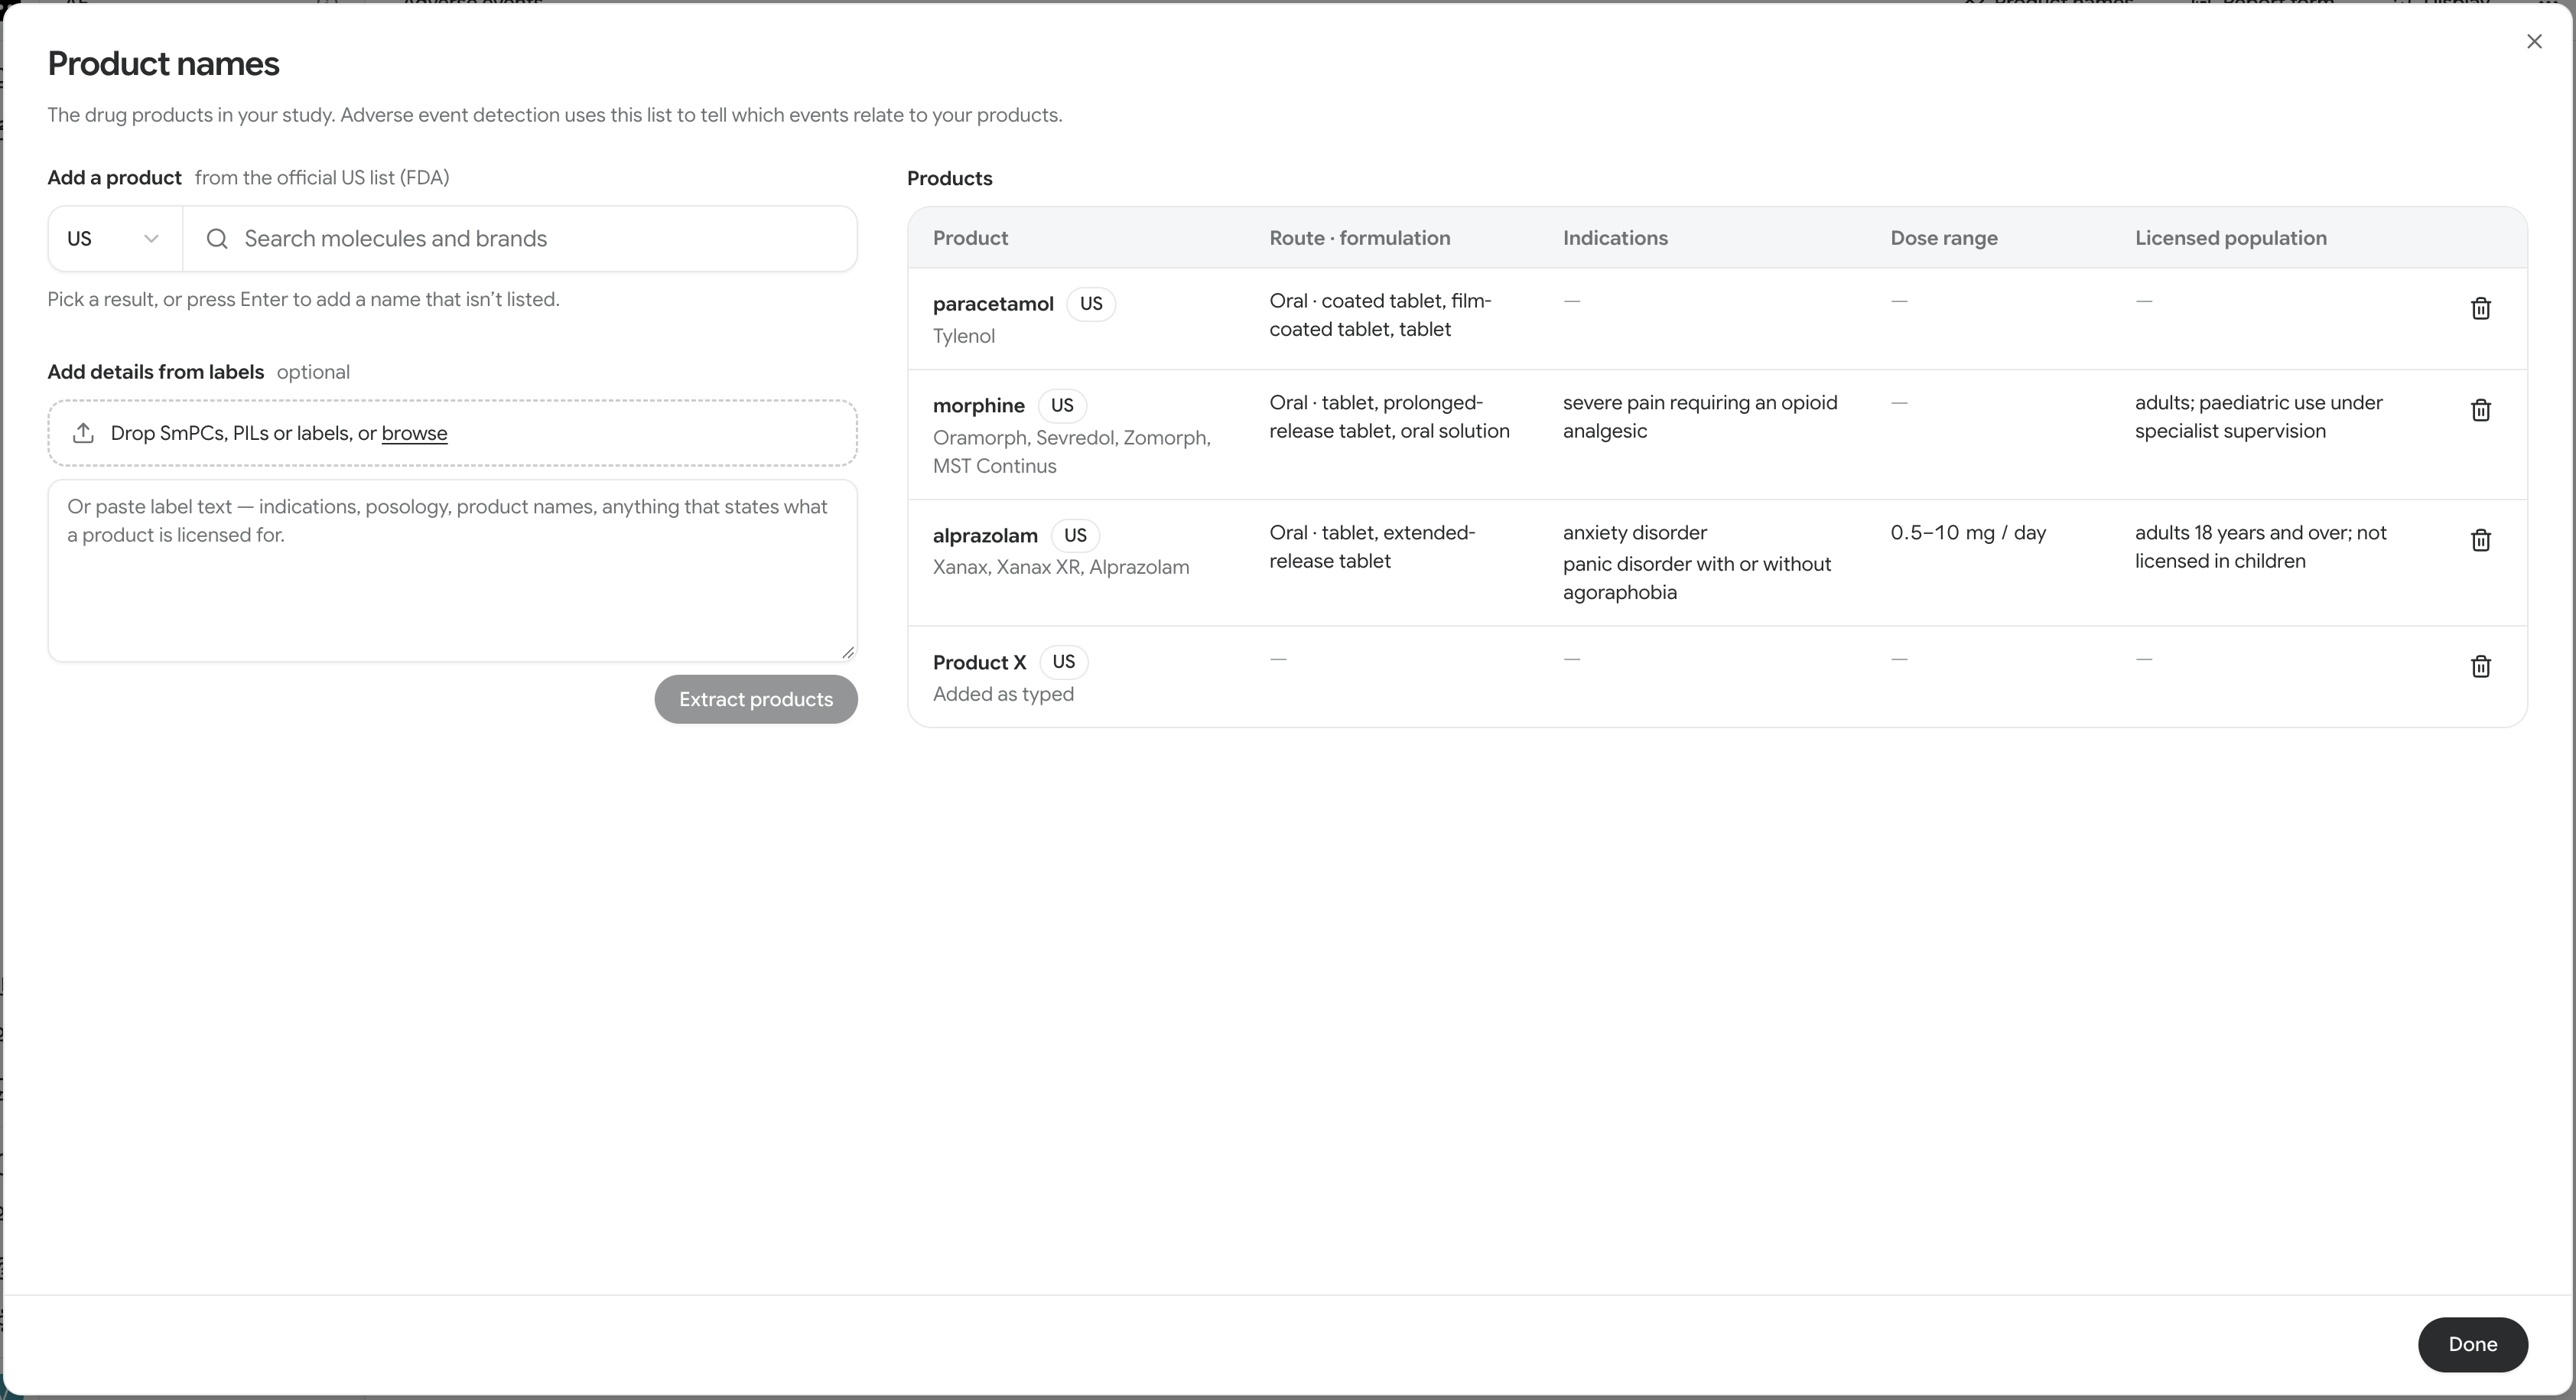 When you add the project’s first product, CoLoop turns on Auto-detect new transcripts. When you then close the dialog, it runs detection over every transcript you haven’t ruled on, using every product you added. You don’t need to start detection yourself. If your first products come only from a label, detection runs when its extraction finishes.
Pick a product from the official list
-
Under Add a product, check the market in the dropdown inside the search box.
- Type a molecule or brand name. Results appear as you type, and a misspelled name still finds close matches.
-
Click a result, or move to it with the arrow keys and press Enter:
- A Brand result adds that brand only. You can add brands that share a molecule but differ in license, such as Ozempic and Wegovy, as separate products.
- A Molecule result adds the substance in general, with its most common brands.
Add a name that isn’t listed
Use this for investigational drugs, internal codes, products in the Other market, or anything the list doesn’t have.- Type the name in the search box.
- Press Enter, or click Use ”…” as typed.
Add details from labels
Upload a product’s SmPC, PIL or internal label so detection knows its indications, doses and licensed population.- Under Add details from labels, add your sources:
- Drop up to 10
.docxor PDF files on the drop area, or click browse to choose them. - Paste label text in the text box, such as its indications, posology or product names.
- Drop up to 10
- Wait for every file to finish uploading, then click Extract products.
- A card shows while extraction runs, usually for under a minute. You can keep working or close the dialog.
Edit a product
Correct a product’s details, or enter what you know when you don’t have its label.- Hover over the cell you want to change in the Products table, then click the pencil icon.
-
Change the fields:
- Click Save, or press Enter. In Indications and Licensed population, press ⌘↵ (Ctrl+Enter on Windows), since Enter starts a new line. Press Esc to cancel.
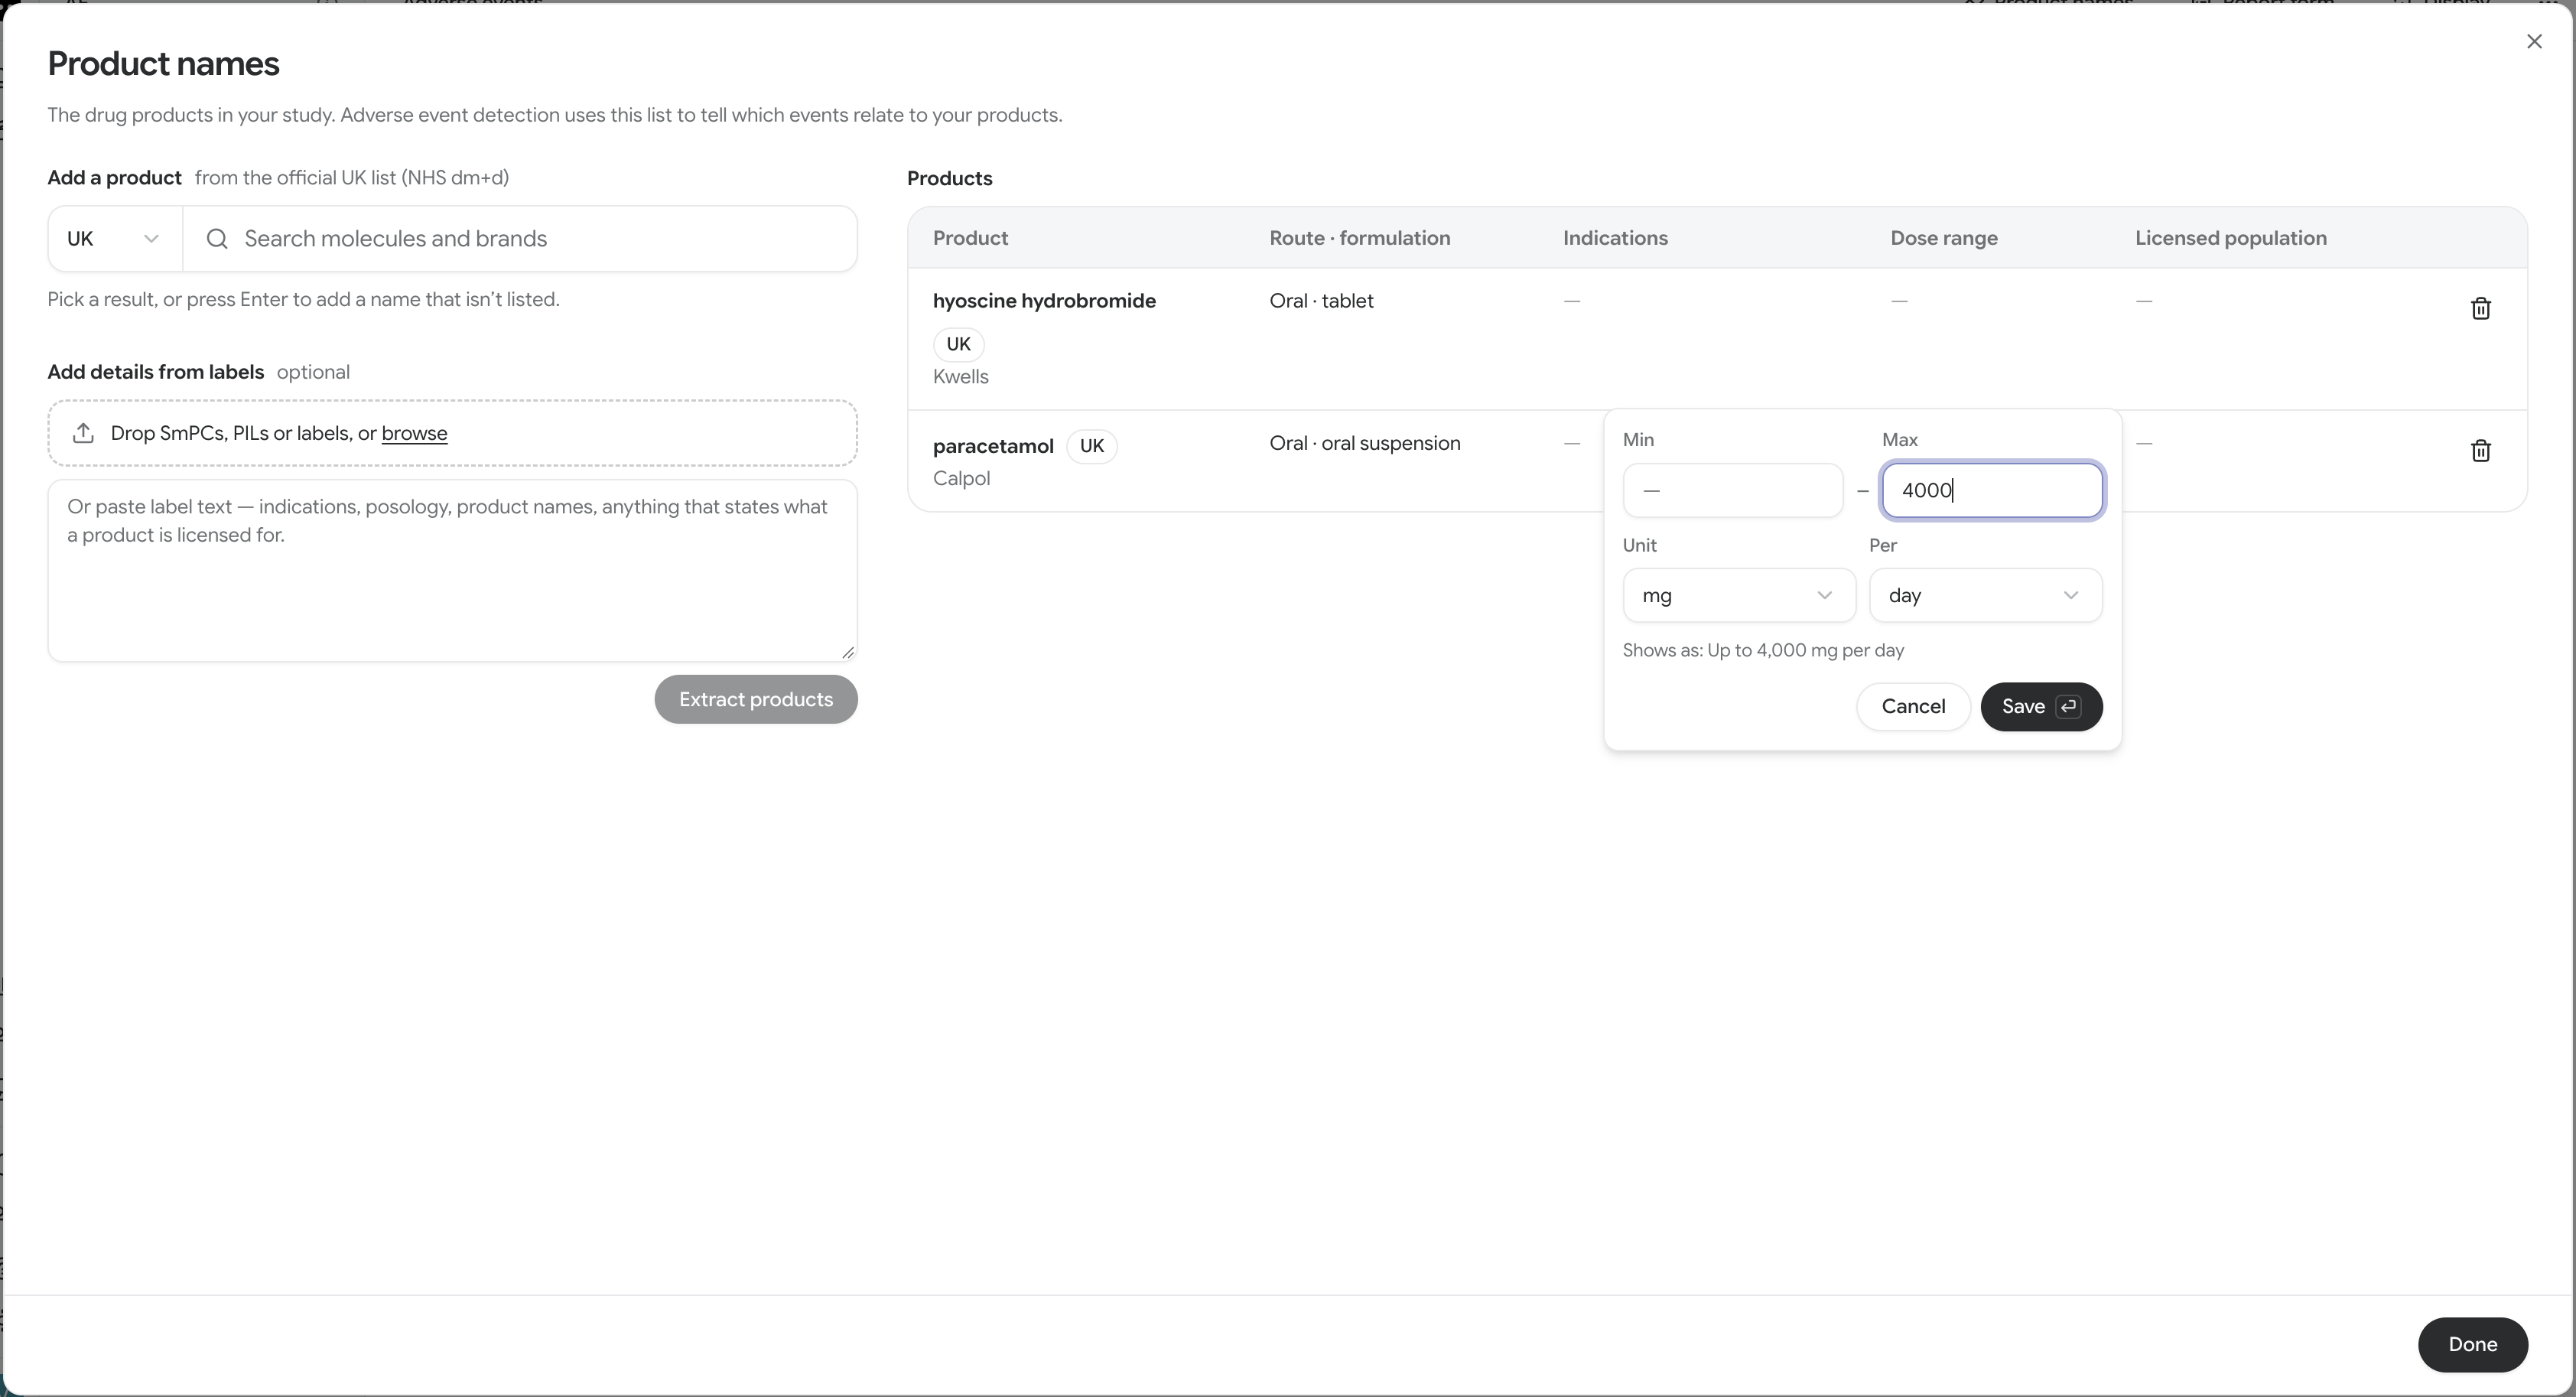 Detection uses your changes from the next run. To check transcripts already detected against them, run detection again. A label you upload later fills only the fields that are still empty, so it never replaces what you entered.
Remove a product
Click the trash icon at the end of the product’s row.If adding a product doesn’t work
- The search says the official list isn’t available right now. Type the name and press Enter to add it as typed.
- A file shows “Upload failed.” Remove it, then add it again. Extract products stays unavailable until every file has uploaded or been removed.
- “Could not read these sources.” appears. The message beneath it gives the reason. A scanned PDF has no selectable text, a file that isn’t a
.docxor PDF can’t be used, and sources with more text than one extraction can read must be shortened. Fix the sources, then click Extract products again. Your files and pasted text stay in place. - A notice reads “Could not read” followed by the source names. Extraction didn’t finish, and the reason is shown in the notice. Click Dismiss, then add the sources again.
- “No products found in those sources.” or “Nothing new in those sources.” appears. Extraction read them but found no licensed product. Check you added the right documents.
- “This product is already in the product list.” appears when you change a product’s market. That market already has the same product from its official list. Keep the market as it was, or remove the other product first.
- The search box is unavailable and says the project has 30 products. Remove a product you don’t need. An extraction that would take the project past 30 products is refused the same way.
Run detection
- Click Detect in the start card, or click ⋯ at the top right of the page and then Detect.
- Wait for the runs to finish, which may take a few minutes.
Review each case
Each case is one card. The left side is what detection found. The right side is the participant’s own words it rests on.- Participant and case number: case numbers run across the whole project, so each case keeps its number in exports and report forms.
- Category: Adverse event, Product complaint or Special situation, and the product named, or No product named.
- Description: one sentence summarizing the occurrence.
- Quotes: the exact words from the transcript that evidence the case. The researcher’s question that prompted them is shown above. To hide it, click Display, then turn off Quote context.
 To decide a case:
- Read the quotes and ask whether the description is a fair account of them.
- Click Accept or Reject. The card updates immediately. A rejected case dims and is struck through, but stays visible so you can see what you rejected.
- If you change your mind, click the active verdict again to clear it.
Merge cases from one answer
Detection raises one case per occurrence, so a participant who says they had nausea and vomiting on a medicine gets two cases. They can be merged if you want to report them as one event. You can merge cases from the same transcript that have the same participant, product and category, and quote exactly the same answers. The list groups these cases together under Cases 010 and 011 quote the same answer.- In the group, click Merge 2 cases. The button shows how many cases the group holds. If the group already holds a merged case, click Add to merge.
- Untick any case you want to keep separate. You need at least two.
- Check the description. It starts as the cases’ descriptions joined together. Rewrite it the way you’ll report the event, for example Gastrointestinal side effects: nausea and vomiting.
- Click Merge, or press ⌘↵ (Ctrl+Enter on Windows).
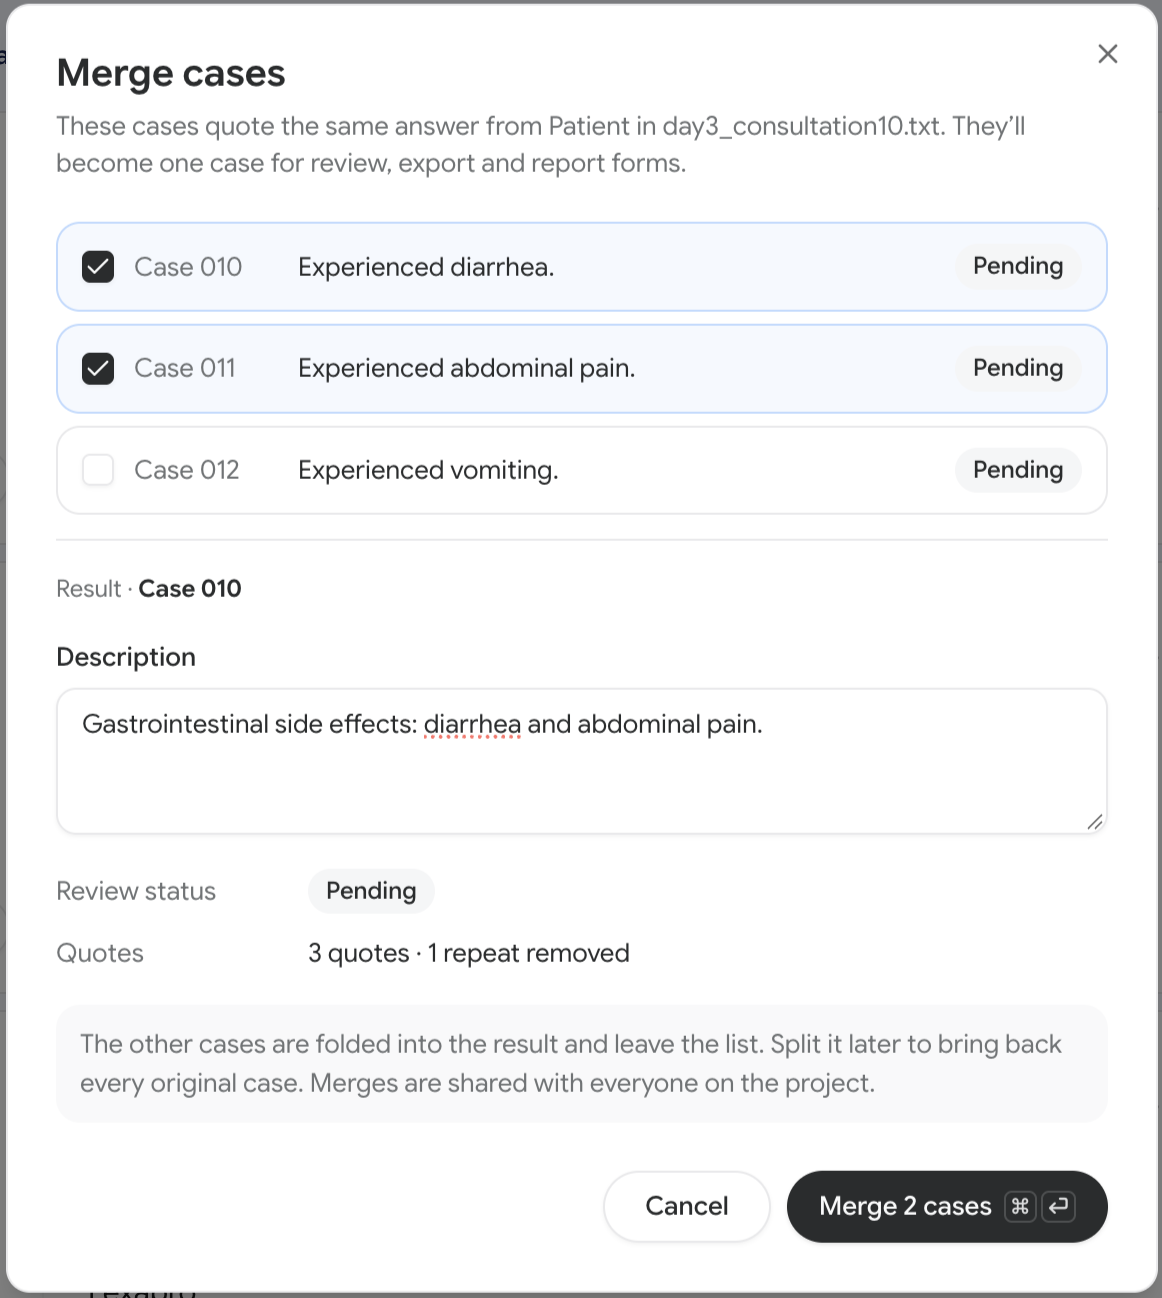 The merged case keeps the lowest case number, and the other cases leave the list. It holds every quote from the cases you merged, without repeats. It exports as one row in the case log, with one report form.
To undo a merge, click Split under the merged case’s number, then Split into 2 cases. Every original case comes back with its own number, description, quotes and review status. The merged case’s description and review status are discarded.
The merged case keeps the lowest case number, and the other cases leave the list. It holds every quote from the cases you merged, without repeats. It exports as one row in the case log, with one report form.
To undo a merge, click Split under the merged case’s number, then Split into 2 cases. Every original case comes back with its own number, description, quotes and review status. The merged case’s description and review status are discarded.
Filter and sort cases
Use the bar above the list to focus on the cases you’re working on.
- Status: click All, Pending, Accepted or Rejected to show only cases with that verdict. Each tab shows how many cases it holds. Work through Pending to clear your queue: a case leaves the tab as soon as you decide it.
- Files: click Files, then search for and select the transcripts to show.
- Participants: click Participants, then search for and select the participants to show.
- Products: click Products, then search for and select the products to show. The list offers every product named by a detected case. Until a case names one, it reads “No products detected yet.”
- Sort: click the sort button on the right, then choose By filename or By detected date and a direction. Transcripts are listed newest detection date first by default.
Run detection again
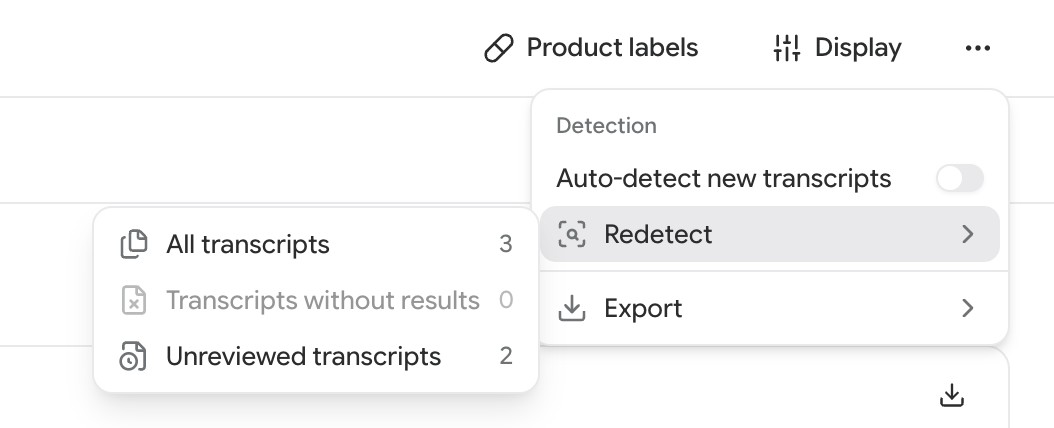
Run detection again to pick up transcripts that failed, or to replace results after you change the project’s products.- Click ⋯ at the top right of the page, then Redetect.
- Choose which transcripts to run:
- All transcripts: every processed transcript in the project.
- Transcripts without results: transcripts that were never detected, failed, or have results that can’t be read.
- Unreviewed transcripts: transcripts with no accepted or rejected case.
 Redetect is unavailable while detection is running. Wait for the finished notification, then try again.
Detect new transcripts automatically
While Auto-detect new transcripts is on, every transcript runs through detection as soon as it finishes processing. CoLoop turns it on for you when you add the project’s first product. To turn it off or on, click ⋯ at the top right of the page, then click the Auto-detect new transcripts switch. Turning it on starts nothing for transcripts already in the project. Use Redetect for those. A reprocessed transcript is detected again only if you haven’t ruled on any of its cases.Choose the report form
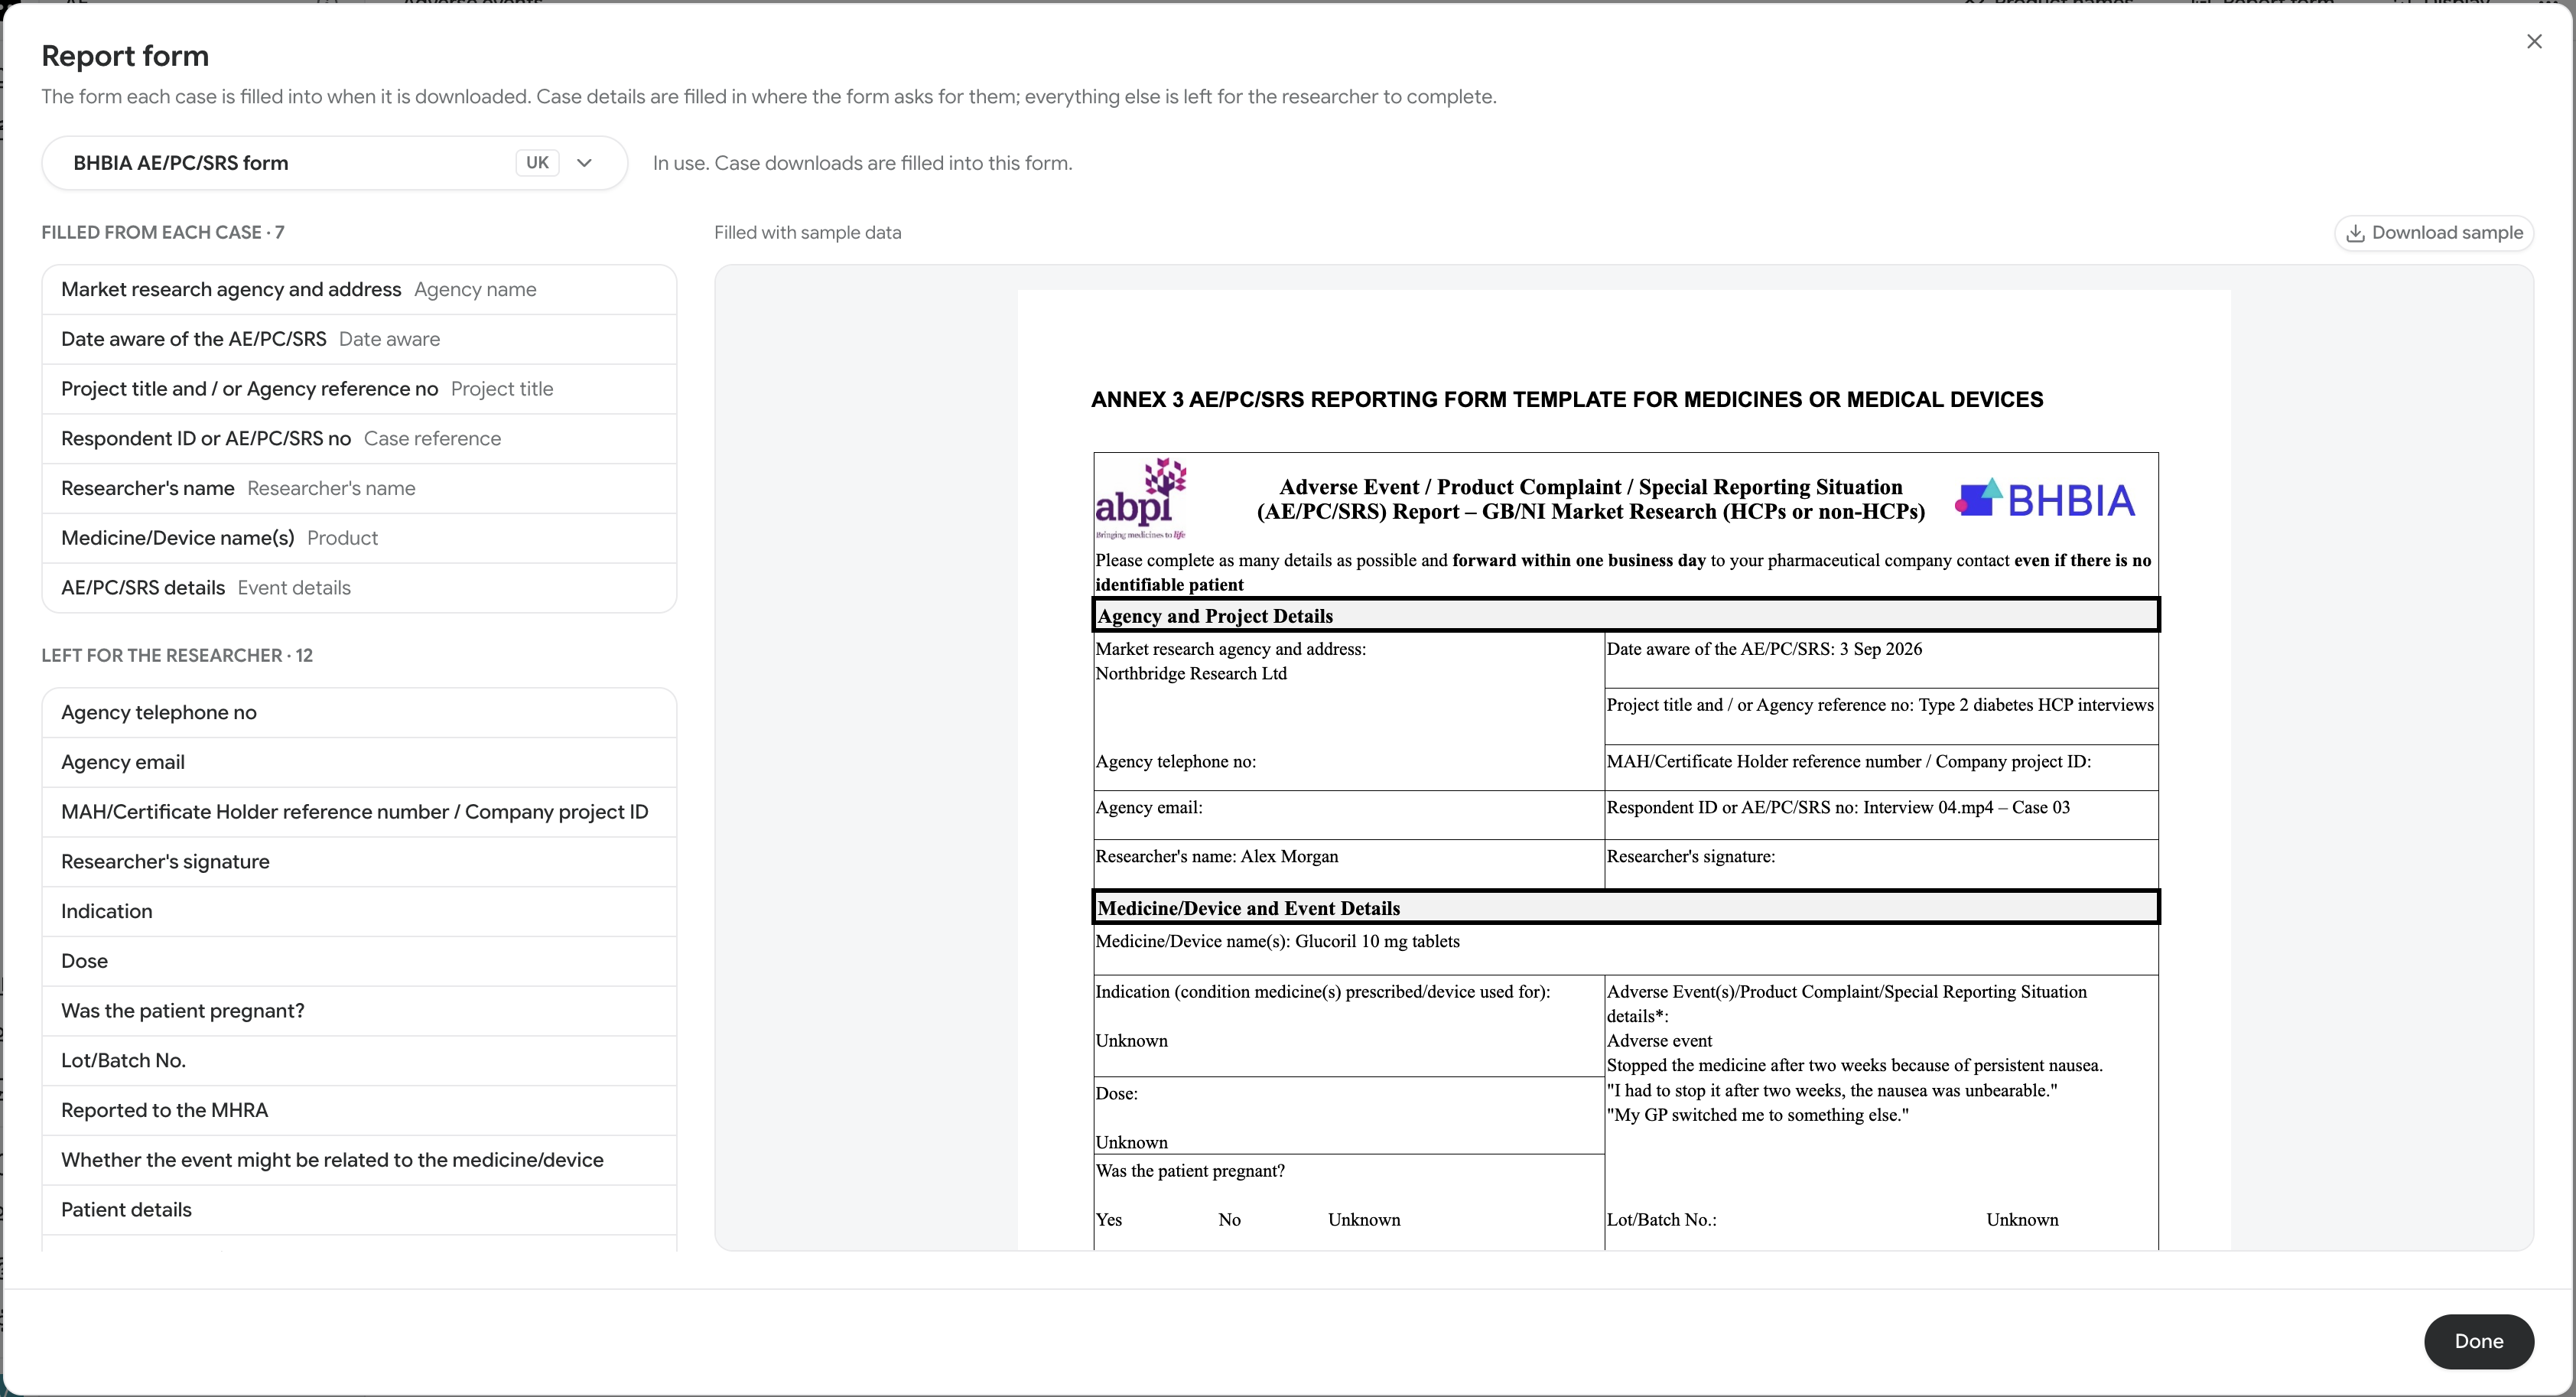
Case forms are filled into one of two standard forms, depending on where the project’s data is stored:- BHBIA AE/PC/SRS form for projects stored in the UK.
- EPHMRA AE reporting form for projects stored in the US or any other region.
Switch standard form
- Click Report form at the top right of the page. The dialog shows the form in use, filled with sample data, beside the case details it’s filled with and the places left for the researcher.
- Open the form menu at the top of the dialog and pick the other standard form.
Use your own form
Upload the blank or pre-filled form as a Word (.docx) file of up to 30 MB, or a fillable PDF of up to 50 MB. A fillable PDF is one where you can click into the boxes and type. Scanned or flattened PDFs, PDFs protected against editing and dynamic (XFA) PDFs can’t be filled.
- Click Report form at the top right of the page.
- Open the form menu and click Upload your own form…, then choose the file.
- Wait while CoLoop reads the form and finds where each case detail goes. This may take a few minutes. You can close the dialog in the meantime: Your report form is ready to review appears when it’s done.
Review where case details land
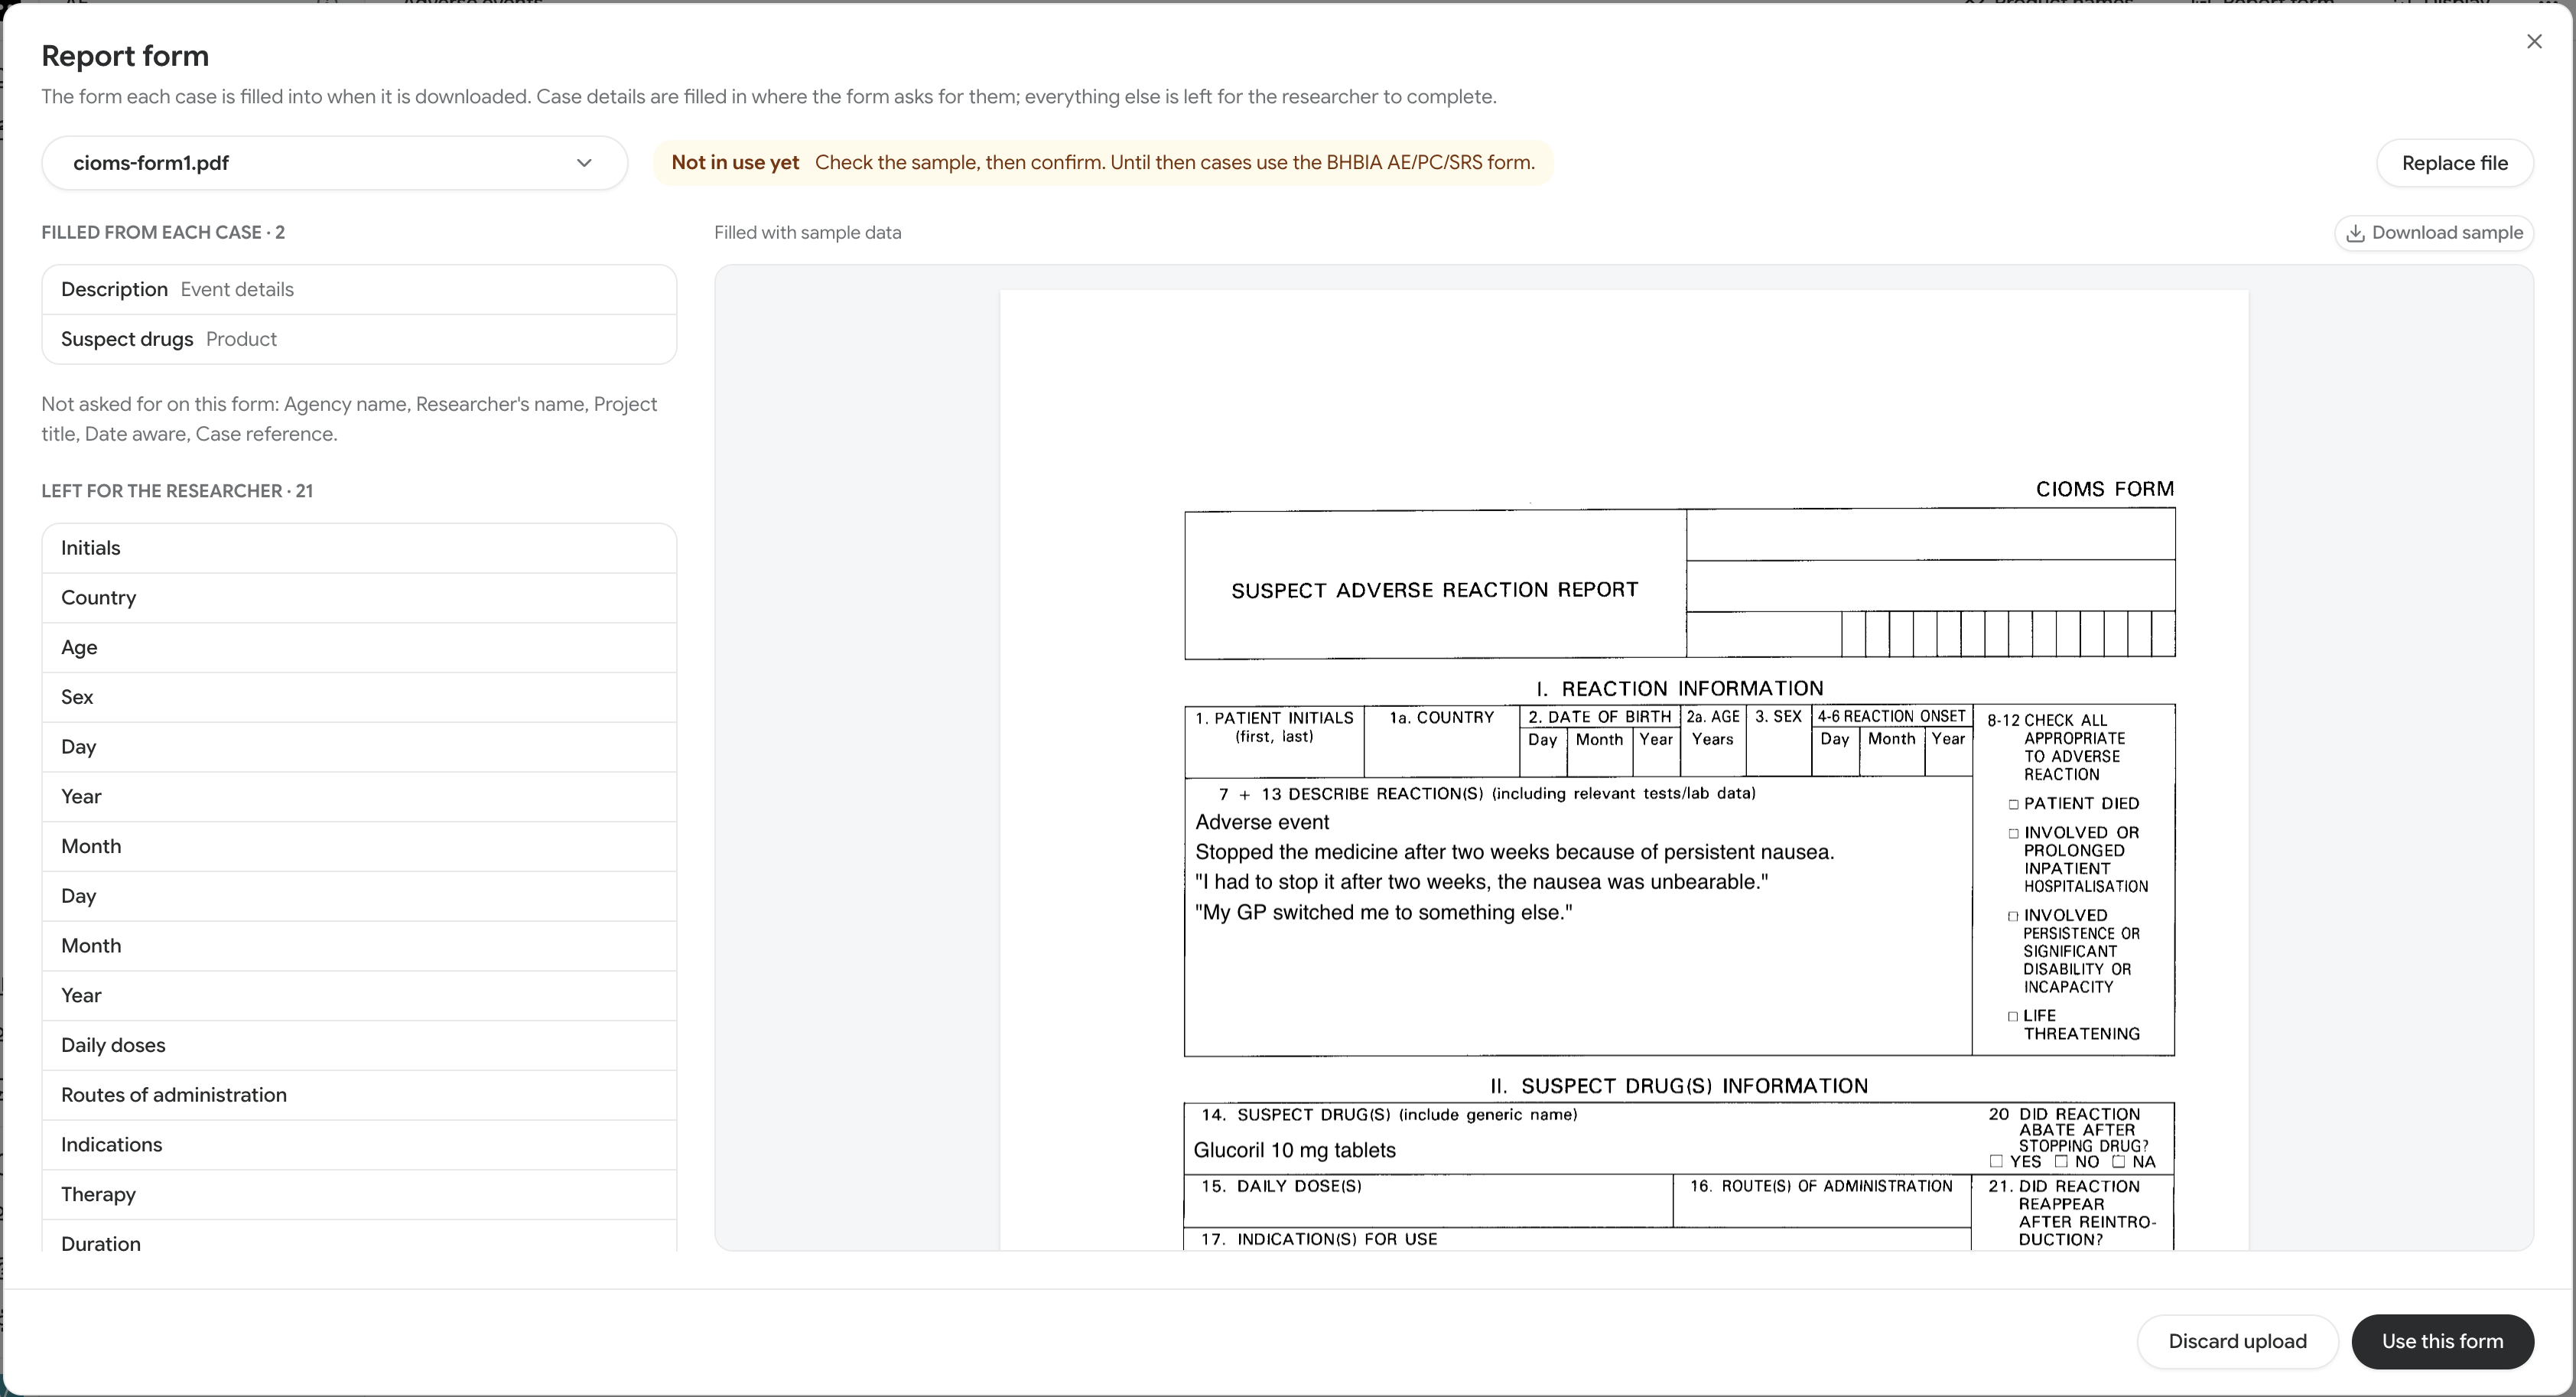
The review lists every place on your form, beside the form filled with sample data:- Filled from each case: the places CoLoop fills, and which case detail goes in each.
- Kept from your form: answers already written on the file, which appear on every form as written. Ones marked About one case, such as a patient’s age, describe a single case: remove them from the file and upload it again.
- Left for the researcher: places CoLoop leaves blank for you to complete.
 Then decide:
- If the details land in the right places, click Use this form. The dialog closes, and every case form you download from now on uses it.
- If something lands in the wrong place, correct the file and click Replace file, or click Discard upload to keep the current form.
Replace your form or go back to a standard form
Click Report form to see the form in use and when it was chosen.- To use a new version, click Replace file and upload it. You review it the same way, and the current form stays in use until you click Use this form.
- To go back to a standard form, pick it from the form menu. Your form stays in the menu under Your form, so you can switch back to it without uploading it again.
How a PDF form is filled
CoLoop writes into a fillable PDF’s own fields in Helvetica, making text smaller where it doesn’t fit its box. A box the form draws as several lines takes the text across all of them. A PDF form can’t take every case. The download stops with a message if a case’s text doesn’t fit its box even in the smallest print, or uses characters the form can’t show, such as letters outside Western European languages. Fill that case’s form in by hand, or replace the project’s form with a Word version, which has no such limits.Export cases
- Filter the list down to the cases you want to export, or leave it unfiltered to export every case.
- Click ⋯ at the top right of the page, then Export.
- Choose a format:
- Case log (.xlsx): an Excel workbook with one row per case.
- Report forms + case log (.zip): a report form for each case, with the case log beside them. Each form is the project’s report form: the standard form for the project’s storage region unless you’ve chosen another.
Download one case’s report form
To get the report form for a single case, click the download icon above the case’s quotes. The form downloads named after the case number and the project, as a.docx, or as a .pdf if the project’s report form is a PDF.
If something goes wrong
- A transcript reads “Detection failed.” The reason is shown beneath it. Click ⋯, then Redetect > Transcripts without results to retry. A failed run has no verdicts to lose.
- A transcript reads “This run’s results could not be read.” The stored result can’t be opened by the current version of CoLoop. This is not the same as finding nothing. Click ⋯, then Redetect > Transcripts without results.
- Cases from the same answer aren’t grouped for merging. Cases are grouped only when they have the same participant, product and category, and quote exactly the same answers. If one of them also quotes another part of the transcript, it can’t be merged with the others.
- The list reads “No cases match these filters.” Click Clear filters to remove the file, participant and product filters, or choose another status tab.
- The page reads “Could not load adverse events.” Click Try again. If it persists, refresh the page.
- The Report form dialog reads “Could not use” and your file’s name. The reason and what to do are shown beneath it. Most often the PDF has no fillable fields, is protected against editing, or is a dynamic (XFA) form. Upload the Word version or a fillable copy with Upload another file, or click Dismiss to keep the current form.
- The download icon and the zip option are unavailable. The page is still checking which report form the project uses. If Report form shows a red warning icon, the check failed: click Report form, then Try again.